VeighNa量化社区
你的开源社区量化交易平台 | vn.py | vnpy
Member
avatar
加入于:
帖子: 5361
声望: 325

发布于veighna社区公众号【vnpy-community】
 
原文作者:用Python的交易员 | 发布时间:2023-04-28
 

本周发布了VeighNa的3.7.0版本,本次更新的主要内容是增加了量化交易容器解决方案VeighNa Docker,为Linux和Mac系统用户提供类似VeighNa Studio的快速安装部署功能。

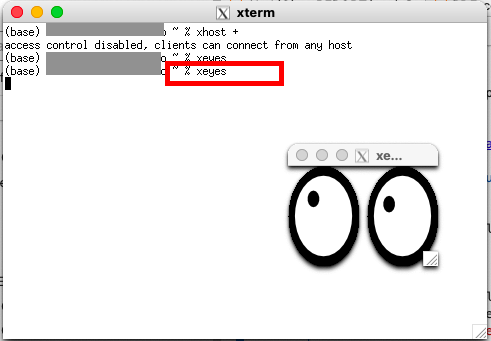
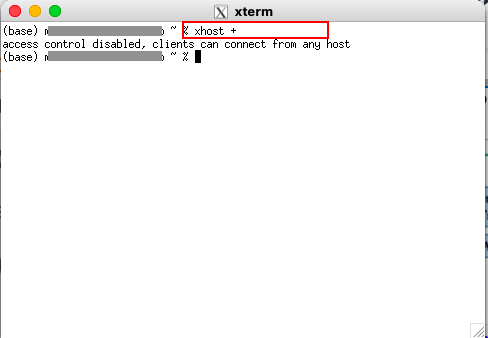
在此首先要对社区用户【eis】表示感谢!正是他在社区论坛中分享的xhost图形界面输出方案,帮助我们找到了如何基于Docker容器运行GUI程序的技术方向。

对于已经安装了VeighNa Studio的用户,可以使用快速更新功能完成自动升级。对于没有安装的用户,请下载VeighNa Studio-3.7.0,体验一键安装的量化交易Python发行版,下载链接:

https://download.vnpy.com/veighna_studio-3.7.0.exe


是否需要学习Docker


开始正文内容之前想要说明下:对比VeighNa Studio,使用VeighNa Docker需要掌握更高水平的开发技术知识,并不一定适合所有用户。

这里梳理一些VeighNa Docker适合的应用场景:

  • 实盘交易中使用Linux系统,希望实现更低的tick-2-trade延时;
  • 需要分布式部署的程序基础设施,解决策略并发数量上限的瓶颈;
  • 交易团队已经有一定规模,需要标准化的量化投研环境部署管理。

如果你有上述需求,那么强烈推荐继续往下看。


认识Docker容器技术


从互联网上普遍能搜索到的描述定义来看,Docker是一套开源的应用容器引擎,采用操作系统级别的虚拟化技术来对【软件应用】及其【依赖的运行时环境】进行打包,并将打包完成的轻量级容器快速部署到各种不同环境中高效运行。

看完这段有点绕口的文字,不知道大家的感觉如何?反正当我第一次接触Docker的时候挺晕的,所以这里试着通过类比的方式来帮大家更加容易地理解。

不管是投研回测还是实盘交易,想要成功运行起来一个VeighNa量化平台的程序,必须确保当前的系统上已经安装好了:

  1. Python解释器(3.7-3.10版本)
  2. 依赖的三方库(NumPy、TA-Lib、Plotly、PySide6等)
  3. VeighNa核心框架和功能插件

上述三块内容中,3就是前文中的【软件应用】,而1和2加在一起则是【依赖的运行时环境】。那么为了实现这三块内容的快速安装部署,在Windows系统上的解决方案就是VeighNa Studio,运行exe安装包后几次点击就能自动完成整个安装流程。

由于Linux系统上软件安装方式的区别:例如系统自带Python(影响1)、底层依赖库的全局影响(影响2)等,导致无法直接照搬VeighNa Studio的方案,更好的选择是采用类似虚拟机的形式将1-3整体打包后进行分发部署(直接不用安装了)。

description

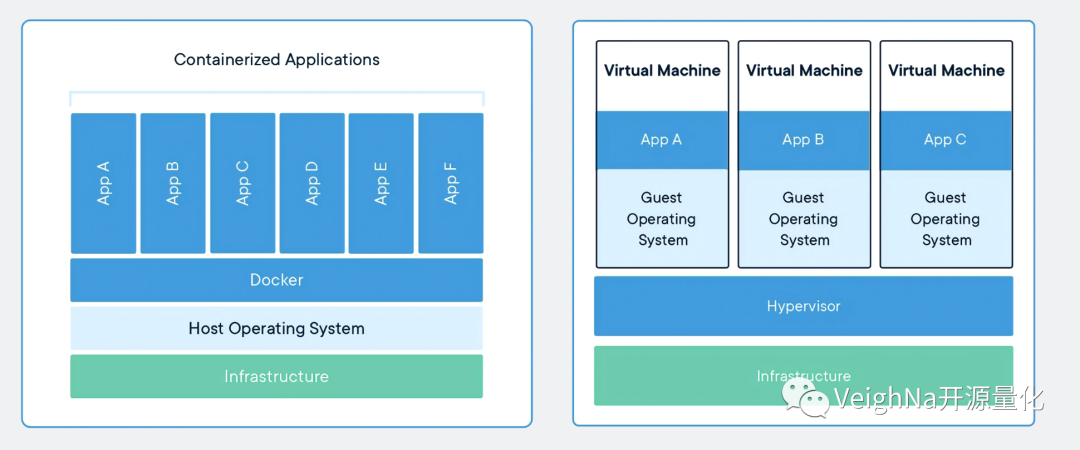
在还没有VeighNa Studio的1.0版本时代,我们就曾经推出过基于VirtualBox的虚拟机镜像,但大家用下来普遍反馈虚拟机对比实体机的性能损耗还是挺明显。背后的原因可以参考上图的右侧部分,虚拟机中的应用程序和底层硬件中间,隔着有Hypervisor(虚拟硬件层)和Guest OS(虚拟机内系统)两层组件,带来了显著的开销(分钟级的启动耗时)。

2013年发布的Docker带来了更加轻量级的方案。参考上图的左侧部分,在宿主机的操作系统上仅需运行Docker守护进程来负责对Docker容器进行运维管理,省去了臃肿的虚拟机内系统,从而实现更高的运行效率:节省大量系统资源、毫秒级的启动耗时、接近原生运行的性能水平。

本次3.7.0版本中新增的VeighNa Docker,就是打包了Python解释器、底层依赖库和VeighNa量化平台的完整量化容器镜像,仅需几行命令就能实现自动下载和运行启动。


Docker安装流程


运行Docker容器之前需要先安装Docker引擎,这里重点介绍在Linux(Ubuntu 22.04)服务器上的安装流程,不清楚的地方推荐参考官方文档中的安装教程

1. 卸载移除老版本程序:

sudo apt-get remove docker docker-engine docker.io containerd runc

2. 更新apt源并安装HTTPS访问所需的库:

sudo apt-get update
sudo apt-get install \
    ca-certificates \
    curl \
    gnupg

3. 添加Docker官方的GPG Key:

sudo install -m 0755 -d /etc/apt/keyrings
curl -fsSL https://download.docker.com/linux/ubuntu/gpg | sudo gpg --dearmor -o /etc/apt/keyrings/docker.gpg
sudo chmod a+r /etc/apt/keyrings/docker.gpg

4. 设置添加apt仓库:

echo \
    "deb [arch="$(dpkg --print-architecture)" signed-by=/etc/apt/keyrings/docker.gpg] https://download.docker.com/linux/ubuntu \  
    "$(. /etc/os-release && echo "$VERSION_CODENAME")" stable" | \  
    sudo tee /etc/apt/sources.list.d/docker.list > /dev/null

5. 再次更新apt源:

sudo apt-get update

6. 安装Docker引擎等组件:

sudo apt-get install docker-ce docker-ce-cli containerd.io docker-buildx-plugin docker-compose-plugin

7. 运行hello-world镜像验证安装成功:

sudo docker run hello-world

8. 安装xhost的运行依赖程序:

apt-get install x11-xserver-utils

9. 启动xhost(注意该命令每次重启系统后都要运行):

xhost +

对于Windows和Mac系统用户直接从Docker官网下载安装Docker Desktop即可,Windows上推荐启用WSL2环境。


上手VeighNa Docker


完成Docker引擎的安装配置后,运行VeighNa Docker就相当简单了。

在用户目录下创建一个空文件夹(这里假设为/home/user/trader),在其中放置run.py启动脚本文件,内容为:

from vnpy.event import EventEngine
from vnpy.trader.engine import MainEngine
from vnpy.trader.ui import MainWindow, create_qapp

from vnpy_ctp import CtpGateway
from vnpy_ctastrategy import CtaStrategyApp
from vnpy_ctabacktester import CtaBacktesterApp


def main():
    """Start VeighNa Trader"""
    qapp = create_qapp()

    event_engine = EventEngine()
    main_engine = MainEngine(event_engine)

    main_engine.add_gateway(CtpGateway)
    main_engine.add_app(CtaStrategyApp)
    main_engine.add_app(CtaBacktesterApp)

    main_window = MainWindow(main_engine, event_engine)
    main_window.showMaximized()

    qapp.exec()

if __name__ == "__main__":    
    main()

然后在终端Terminal中运行下述命令:

docker run \
-e DISPLAY=$DISPLAY \
-v /tmp/.X11-unix:/tmp/.X11-unix \
-v /home/user/trader:/home \
veighna/veighna:3.7 python3 run.py

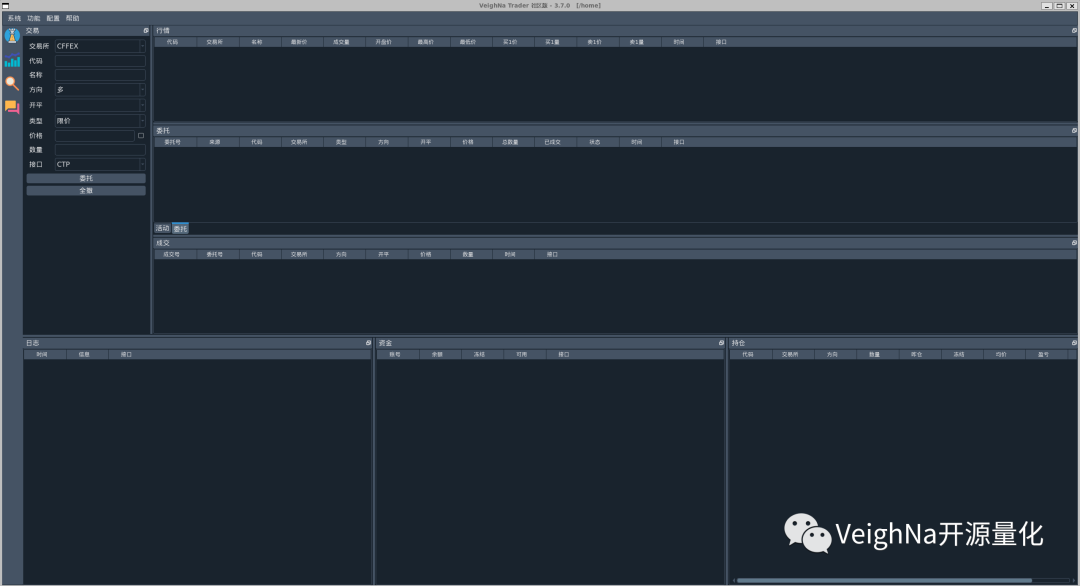
如果是第一次运行,Docker引擎会自动从Docker Hub网站上下载拉取veighna/veighna:3.7镜像(大约几分钟的时间,取决于网络带宽),并在下载完成后直接启动容器,此时就可以看到熟悉的VeighNa Trader界面了:

description

尽管容器和虚拟机在底层实现上有着挺大区别,但是对于其中运行的程序来说整体环境相当类似,在容器中同样存在运行程序时的默认用户目录/home。

运行docker run命令时,我们通过参数【-v /home/user/trader:/home】,将之前在操作系统中新建的/home/user/trader(包括其中的文件)挂载到了容器内的/home目录下,从而保证在容器内运行【python3 run.py】命令时能够成功找到run.py文件。

在VeighNa Trader的运行过程中,临时文件(JSON配置文件、SQLite数据库文件等)会被写入到容器内的/home/.vntrader文件夹中,由于前面的挂载机制等同于外部系统中的/home/user/trader/.vntrader文件夹。该文件夹中的内容即使关闭Docker容器后也依旧存在,从而满足程序运行过程中的数据持久化需求。

目前VeighNa Docker中已经打包的模块包括:

  • 交易接口

    • vnpy_ctp、vnpy_ctptest
    • vnpy_mini
    • vnpy_sopt
    • vnpy_uft
    • vnpy_esunny、vnpy_tap
    • vnpy_xtp
    • vnpy_rohon
    • vnpy_tts
    • vnpy_ib
  • 策略应用

    • 除了vnpy_excelrtd以外的所有开源应用模块
  • 数据库适配器

    • vnpy_sqlite
    • vnpy_mysql
    • vnpy_postgresql
    • vnpy_mongodb
  • 数据服务接口

    • vnpy_rqdata
    • vnpy_tushare
  • 投研环境

    • jupyterlab

除了上文中展示的VeighNa Trader外,VeighNa Docker还支持更多其他的运行方式,例如Jupyter Lab交互式投研环境、VS Code容器内代码开发、no_ui交易服务运行等,我们将会在后续的文章中详细讲解,欢迎关注。


CHANGELOG


新增

  1. 新增沪股通和深股通交易所枚举值
  2. 增加vnpy_tap对于Linux系统的支持
  3. 增加vnpy_rqdata对于新型主力合约数据支持(切换前一日收盘价比例复权)

调整

  1. vnpy_ctastrategy/vnpy_ctabacktester加载策略类时,过滤TargetPosTemplate模板
  2. vnpy_ctp连接登录过程中,只有在授权码错误的情况下,才禁止再次发起认证
  3. vnpy_uft增加对广期所GFEX的支持
  4. vnpy_tqsdk增加对于output日志输出功能的支持
  5. vnpy_dolphindb允许指定用户自行配置具体的数据库实例
  6. vnpy_rqdata优化对于郑商所期货和期权合约的查询代码转换规则
  7. vnpy_rqdata增加对广期所GFEX的支持
  8. vnpy_portfoliostrategy增加回测爆仓检查
  9. vnpy_portfoliostrategy策略模板增加合约乘数查询函数get_size
  10. vnpy_portfoliostrategy回测加载日线和小时线数据时,不使用分段加载

修复

  1. 修复vnpy_rpcservice中,RPC接口对于推送数据的vt前缀相关字段错误问题
  2. 修复vnpy_mini中,对于INE交易所今昨仓位的特殊处理
  3. 修复vnpy_datamanager中,批量数据更新时缺失output函数的问题
  4. 修复vnpy_spreadtrading中,回测加载数据时优先从数据服务获取历史数据的问题,改为优先从本地数据库加载


Member
avatar
加入于:
帖子: 2
声望: 2

MacOS上运行 Veighna Docker安装指南(中文)

1. 为支持GUI从Docker到宿主机的转发,安装 X-Server。

Veighna 拥有一个 GUI 运行平台, 但docker并不直接支持, 必须在宿主机上安装一个X-Server 管理程序。X-Server可以支持显示任务转发,这样docker系统就可以通过它在主机展示GUI界面。 (X-Server组织主页 )。

1.1 在macOS上安装XQuartz (下载官方源) (链接: https://pan.baidu.com/s/1ABX4zCtfqS7vX2XFs8renQ?pwd=d8xc 提取码: d8xc

--来自百度网盘超级会员v6的分享)

1.2 待 XQuartz 安装更新完毕, 启动并在 XQuartz 终端输入:

xhost +

终端会显示: access control disabled, clients can connect from any host -- 这表示安装设置成功。
description

1.3 为了测试下,在 XQuartz 终端输入:

xeyes

屏幕将显示一个动态的眼睛窗口,表示运行成功。
description

2. 为后续使用设置宿主机的环境变量.(这将本机ip地址与端口赋给DISPLAY变量)

export DISPLAY=$(ifconfig en0 | awk '/inet / {print $2}'):0.0

3. 安装并运行 socat

Socat是一个多用途中继器,将Docker容器和主机之间建立通信管道, 允许显示信息从Docker容器传送到主机.( Socat Introduction) 我们在一个 新的 macOS 终端运行(在macOS 上安装brew,访问 ):

brew install socat

然后在这个新的终端,运行 (在Docker转发显示信息过程中不要关闭这个终端, 或者你使用'nohup' 将它在后台运行):

socat TCP-LISTEN:6000,reuseaddr,fork UNIX-CLIENT:\"$DISPLAY\"

4. 安装并启动 Docker

4.1. 安装 Docker desktop ( Docker 源) 如果第一次安装,我们需要注册一个账户. ( Docker账户 )

4.2 建立本地文件夹,与docker容器共享文件, 并在其中建立 run.py .

假设我们在macOS建立本地文件夹~/vnpy_docker (在终端输入以下命令):

mkdir ~/vnpy_docker

在这个文件夹中,我们建立 run.py 以便VeighNa 启动. (VeighNa 可以在任何文件夹启动 run.py ,用户可以用它启动多个不同实例.) run.py 的内容类似 (通过import python 模块 和添加main_engine 命令,加载用户所需的模块):

from vnpy.event import EventEngine
from vnpy.trader.engine import MainEngine
from vnpy.trader.ui import MainWindow, create_qapp

#from vnpy_ctp import CtpGateway
from vnpy_ctastrategy import CtaStrategyApp
from vnpy_ctabacktester import CtaBacktesterApp

def main():
    """Start VeighNa Trader"""
    qapp = create_qapp()

    event_engine = EventEngine()
    main_engine = MainEngine(event_engine)

    #main_engine.add_gateway(CtpGateway)
    main_engine.add_app(CtaStrategyApp)
    main_engine.add_app(CtaBacktesterApp)

    main_window = MainWindow(main_engine, event_engine)
    main_window.showMaximized()

    qapp.exec()

if __name__ == "__main__":    
    main()

4.3. 登录账户以后,在macOS终端运行如下(以下代码,替换“~/vnpy_docker”为在4.2步中你在主机中建立的本地文件夹,以便与容器目录“/home”分享文件):

docker run -it \
-e DISPLAY=$DISPLAY \
-e XDG_RUNTIME_DIR=/tmp/runtime-root \
-v /tmp/.X11-unix:/tmp/.X11-unix \
-v ~/vnpy_docker:/home \
veighna/veighna:3.9.2 \
python3 run.py

如果本地没有镜像,将会自动从Docker hub上下载最新镜像。

5. 常见问题:

5.1 如果刚刚安装好,运行xhost +出现错误:

xhost: unable to open display ""

可能是XQuartz没有安装完成。注意安装包下载安装,需要有一个更新安装过程,期间重新启动用户后才能安装成功。再次运行xhost +,即出现预期结果

5.2 如果出现信息:

qt.qpa.xcb: could not connect to display >/private/tmp/com.apple.launchd.HCjll2QuPd/org.xquartz:0
qt.qpa.plugin: Could not load the Qt platform plugin "xcb" in "" even though it was >found.
This application failed to start because no Qt platform plugin could be initialized. >Reinstalling the application may fix this problem.
Available platform plugins are: eglfs, linuxfb, minimal, minimalegl, offscreen, vkkhrdisplay, vnc, wayland-egl, wayland, xcb.

只需要启动 X-host and socat即可。

Install Guide for macOS Veighna Docker (English)

1. install an X-Server to support GUI (graphic user interface) from docker to the host machine.

As Veighna owns a GUI platform, which is not supported in docker, an X-Server management app should be installed on the host. An X-Server can support forward display tasks so that docker system can show GUI on its host system. ( organization homepage or download from Baidu Netdisk: https://pan.baidu.com/s/1ABX4zCtfqS7vX2XFs8renQ?pwd=d8xc code: d8xc).

1.1 Install XQuartz on macOS (source)

1.2 After XQuartz is installed and updated, start it and in the XQuartz terminal, type:

xhost +

the terminal will display: access control disabled, clients can connect from any host -- which means setup successful.
description

1.3 to test, simply type again in the XQuartz terminal:

xeyes

the screen will show an dynamic eye like the following, which means successful install.
description

2. setup the host’s envionment variable for future use.( set DISPLAY variable to native ip and ports)

export DISPLAY=$(ifconfig en0 | awk '/inet / {print $2}'):0.0

3. install and run socat

Socat is a multipurpose relay that can create a tunnel between the Docker container and the host, allowing the display information from the Docker environment transmitted to the host machine.(its introduction) We can install in a new macOS terminal( to install brew on macOS visit ):

brew install socat

Then in this new terminal, run the following code ( Do not close the terminal during the docker forwarding the display information, or you use 'nohup' to run it backward):

socat TCP-LISTEN:6000,reuseaddr,fork UNIX-CLIENT:\"$DISPLAY\"

4. install docker and start

4.1. Install docker desktop from Docker source . If first install, we'll need to register an account. ( Docker account id )

4.2 build native folder on host to share the file with the container, and build run.py in it.

assume we build a native folder on macOS (in terminal window type the cammand):

mkdir ~/vnpy_docker

And in this folder, just build a run.py file for VeighNa to star-tup. (VeighNa can be start-up with run.py in any folder, which is convenient for users to start up different instances.) The content of run.py is like (a start-up framework to start with the needed modules through import python modules and add main_engine command):

from vnpy.event import EventEngine
from vnpy.trader.engine import MainEngine
from vnpy.trader.ui import MainWindow, create_qapp

#from vnpy_ctp import CtpGateway
from vnpy_ctastrategy import CtaStrategyApp
from vnpy_ctabacktester import CtaBacktesterApp

def main():
    """Start VeighNa Trader"""
    qapp = create_qapp()

    event_engine = EventEngine()
    main_engine = MainEngine(event_engine)

    #main_engine.add_gateway(CtpGateway)
    main_engine.add_app(CtaStrategyApp)
    main_engine.add_app(CtaBacktesterApp)

    main_window = MainWindow(main_engine, event_engine)
    main_window.showMaximized()

    qapp.exec()

if __name__ == "__main__":    
    main()

4.3 After login the account, run the following in terminal in host pc:

(The following code, replace "~/vnpy_docker" with the native host directory address you have build in step 4.2 so as to share its files with its container directory volume "/home".)

docker run -it \
-e DISPLAY=$DISPLAY \
-e XDG_RUNTIME_DIR=/tmp/runtime-root \
-v /tmp/.X11-unix:/tmp/.X11-unix \
-v ~/vnpy_docker:/home \
veighna/veighna:3.9.2 \
python3 run.py

If there's no image native, it'll pull from dockerhub.

5. Trouble Shooting:

5.1 If you encounter an error message:

xhost: unable to open display ""

when running xhost + after a fresh installation, it is possible that XQuartz was not installed properly. Please make sure to download the installation package and follow the instructions for a complete installation, which may require a system restart. After completing the installation and restarting the user, try running xhost + again, and you should see the expected result.

5.2 If there's a message:

qt.qpa.xcb: could not connect to display >/private/tmp/com.apple.launchd.HCjll2QuPd/org.xquartz:0
qt.qpa.plugin: Could not load the Qt platform plugin "xcb" in "" even though it was >found.
This application failed to start because no Qt platform plugin could be initialized. >Reinstalling the application may fix this problem.
Available platform plugins are: eglfs, linuxfb, minimal, minimalegl, offscreen, vkkhrdisplay, vnc, wayland-egl, wayland, xcb.

you need to start X-host and socat

Member
avatar
加入于:
帖子: 1821
声望: 138

感谢分享!

Member
avatar
加入于:
帖子: 2
声望: 0

感谢二楼的分享,帮大忙了,一些经验分享记录如下:

硬件平台

  • cpu: Mac M3 arm
  • 系统:14.4.1

可以不用 socat 简化处理问题

mac平台下遇到5.2问题的可能性猜测:可以不看

  • XQuartz 版本2.8.5 太新出了新的配置的问题
    • 这个版本允许远程连接好像是需要显示运行 xhost + 了之后再在 偏好设置的安全选项卡勾选允许,还得重启系统才行
© 2015-2022 上海韦纳软件科技有限公司
备案服务号:沪ICP备18006526号

沪公网安备 31011502017034号

【用户协议】
【隐私政策】
【免责条款】