VeighNa量化社区
你的开源社区量化交易平台 | vn.py | vnpy
Member
avatar
加入于:
帖子: 4
声望: 3

vnpy 4.0 Docker镜像制作过程中,从continuumio/anaconda3:latest 作为基础镜像,vnpy 4.0主程序安装成功,ta-lib和pyside6等都安装成功。
容器内已经安装的apt模块:net-tools gcc libxcb1 libxcb1-dev libgl1-mesa-dev libxcb-cursor0 build-essential python3-dev ninja-build ,已经pip 安装的模块:meson meson-python。

按照pip install vnpy_ctp ,或者本地安装(gitclone 代码本地后 pip install)均报错如下:

Obtaining file:///vnpy/vnpy_ctp
  Checking if build backend supports build_editable: started
  Checking if build backend supports build_editable: finished with status 'done'
  Preparing editable metadata (pyproject.toml): started
  Preparing editable metadata (pyproject.toml): finished with status 'error'
  error: subprocess-exited-with-error

  × Preparing editable metadata (pyproject.toml) did not run successfully.
  │ exit code: 1
  ╰─> [55 lines of output]
      + meson setup --reconfigure /vnpy/vnpy_ctp /vnpy/vnpy_ctp/.vnpy_ctpapi -Dbuildtype=release -Db_ndebug=if-release -Db_vscrt=md --native-file=/vnpy/vnpy_ctp/.vnpy_ctpapi/meson-python-native-file.ini
      The Meson build system
      Version: 1.8.1
      Source dir: /vnpy/vnpy_ctp
      Build dir: /vnpy/vnpy_ctp/.vnpy_ctpapi
      Build type: native build
      Project name: vnpy_ctp
      Project version: 6.7.7.1
      C++ compiler for the host machine: c++ (gcc 12.2.0 "c++ (Debian 12.2.0-14+deb12u1) 12.2.0")
      C++ linker for the host machine: c++ ld.bfd 2.40
      Host machine cpu family: aarch64
      Host machine cpu: aarch64
      Program python found: YES (/opt/conda/bin/python3.13)
      Message: 使用pybind11路径: /opt/conda/lib/python3.13/site-packages/pybind11/include
      Message: 构建目标系统: linux
      Library thostmduserapi_se found: YES
      Library thosttraderapi_se found: YES
      WARNING: Please do not define rpath with a linker argument, use install_rpath
      or build_rpath properties instead.
      This will become a hard error in a future Meson release.

      WARNING: Please do not define rpath with a linker argument, use install_rpath
      or build_rpath properties instead.
      This will become a hard error in a future Meson release.

      Build targets in project: 2

      vnpy_ctp 6.7.7.1

        User defined options
          Native files: /vnpy/vnpy_ctp/.vnpy_ctpapi/meson-python-native-file.ini
          b_ndebug    : if-release
          b_vscrt     : md
          buildtype   : release

      Found ninja-1.11.1 at /usr/bin/ninja

      Generating targets:   0%|          | 0/2 eta ?


      Writing build.ninja:   0%|          | 0/32 eta ?

      Cleaning... 0 files.
      + /usr/bin/ninja
      [1/2] Linking target vnctpmd.cpython-313-aarch64-linux-gnu.so
      FAILED: vnctpmd.cpython-313-aarch64-linux-gnu.so
      c++  -o vnctpmd.cpython-313-aarch64-linux-gnu.so vnctpmd.cpython-313-aarch64-linux-gnu.so.p/vnpy_ctp_api_vnctp_vnctpmd_vnctpmd.cpp.o -Wl,--as-needed -Wl,--allow-shlib-undefined -Wl,-O1 -shared -fPIC '-Wl,-rpath,$ORIGIN/../vnpy_ctp/api' -Wl,--start-group -lstdc++ '-Wl,-rpath,$ORIGIN' /vnpy/vnpy_ctp/vnpy_ctp/api/libthostmduserapi_se.so -Wl,--end-group
      /usr/bin/ld: /vnpy/vnpy_ctp/vnpy_ctp/api/libthostmduserapi_se.so: error adding symbols: file in wrong format
      collect2: error: ld returned 1 exit status
      [2/2] Linking target vnctptd.cpython-313-aarch64-linux-gnu.so
      FAILED: vnctptd.cpython-313-aarch64-linux-gnu.so
      c++  -o vnctptd.cpython-313-aarch64-linux-gnu.so vnctptd.cpython-313-aarch64-linux-gnu.so.p/vnpy_ctp_api_vnctp_vnctptd_vnctptd.cpp.o -Wl,--as-needed -Wl,--allow-shlib-undefined -Wl,-O1 -shared -fPIC '-Wl,-rpath,$ORIGIN/../vnpy_ctp/api' -Wl,--start-group -lstdc++ '-Wl,-rpath,$ORIGIN' /vnpy/vnpy_ctp/vnpy_ctp/api/libthosttraderapi_se.so -Wl,--end-group
      /usr/bin/ld: /vnpy/vnpy_ctp/vnpy_ctp/api/libthosttraderapi_se.so: error adding symbols: file in wrong format
      collect2: error: ld returned 1 exit status
      ninja: build stopped: subcommand failed.
      [end of output]

  note: This error originates from a subprocess, and is likely not a problem with pip.
error: metadata-generation-failed

× Encountered error while generating package metadata.
╰─> See above for output.

note: This is an issue with the package mentioned above, not pip.
hint: See above for details.

不知哪里出了问题?是否有解法?在此拜谢。

Super Moderator
avatar
加入于:
帖子: 91
声望: 8

问题核心:CTP API 的动态链接库(libthostmduserapi_se.so 和 libthosttraderapi_se.so)为 x86_64 架构,而你的 Docker 容器运行在 ARM64 架构(如 Mac M1/M2 芯片),导致链接失败。


解决方案

  1. 启用 QEMU 模拟 x86_64 架构

    • 安装 QEMU 用户模式工具,注册处理器以支持 x86_64 架构的容器运行。
  2. 强制使用 x86_64 基础镜像

    • 在 Dockerfile 中指定基础镜像的平台为 linux/amd64,确保容器内所有依赖均为 x86_64 架构。
  3. 安装预编译的 vnpy_ctp 包

    • 通过 pip 安装官方预编译包(已包含 x86_64 架构的二进制库),无需手动编译。
  4. 验证容器架构一致性

    • 构建镜像时指定目标平台为 linux/amd64,运行容器后检查架构是否为 x86_64。

关键点

  • 架构一致性:容器内所有依赖(Python、库文件)必须为 x86_64 架构。
  • 性能影响:QEMU 模拟会带来约 20%-30% 的性能损耗,建议在 x86_64 宿主机上构建生产环境镜像。
Member
avatar
加入于:
帖子: 4
声望: 3

感谢楼上AI回复,基本上是正解。最佳实践顺着这个方向,经过本人亲测,完善如下:

MacOS M 系列芯片 部署 VeighNa 4.0 最新非官方镜像指南

1. 问题:

实现AMD x86 架构的VeighNa 4.0镜像在macOS M系列芯片(当下大多数苹果笔记本电脑芯片架构,ARM arch64)方式部署,以x86芯片架构方式运行vnpy 4.0 docker镜像。

2. 用x86架构VeighNa镜像的必要性:

  • 为什么要做VeighNa 4.0镜像?
    VeighNa 4.0拥有alpha因子交易模块,其它版本还没有此模块;且目前尚未有官方的VeighNa 4.0镜像,只好采用第三方或者DIY。
  • 为什么要用x86架构?
    在不考虑对.so文件反向编译的前提下,无直接ARM架构的镜像制作方案。talib安装,vnpy_ctp等必要模块C++编译时,需要考虑芯片架构。特别是CTP官方API模块中,Linux的动态链接库 github.com/vnpy/vnpy_ctp/vnpy_ctp/api/目录下libthosttraderapi_se.so和libthostmduserapi_se.so两个文件,来自于上期所官方API,是x86架构,官方未发布ARM架构的动态链接库,制作镜像时,若在ARM架构下直接pip install,会导致安装失败。

3. 确认问题:(以在macOS M3芯片 笔记本为例)

在宿主机上查询芯片架构:

uname -a

会显示包含 arm64或者amd64字样,表示不同架构的64位程序。
在容器中查询芯片架构:(找一个可以运行的镜像<image_name>查询)

docker image inspect <image_name> | grep Architecture

会显示容器的架构,同样显示CPU架构字样
以上问题显示Docker的芯片架构与镜像的芯片架构不匹配,需要找到兼容运行的方法。其实,只需要运用macOS M系列芯片自带的Rosetta,即可实现在M系列arch芯片下运行x86程序的目的。

4. 在macOS中设置Docker支持多架构

(1) 安装macOS M芯片版本的Docker Desktop,并完成注册用户登录。
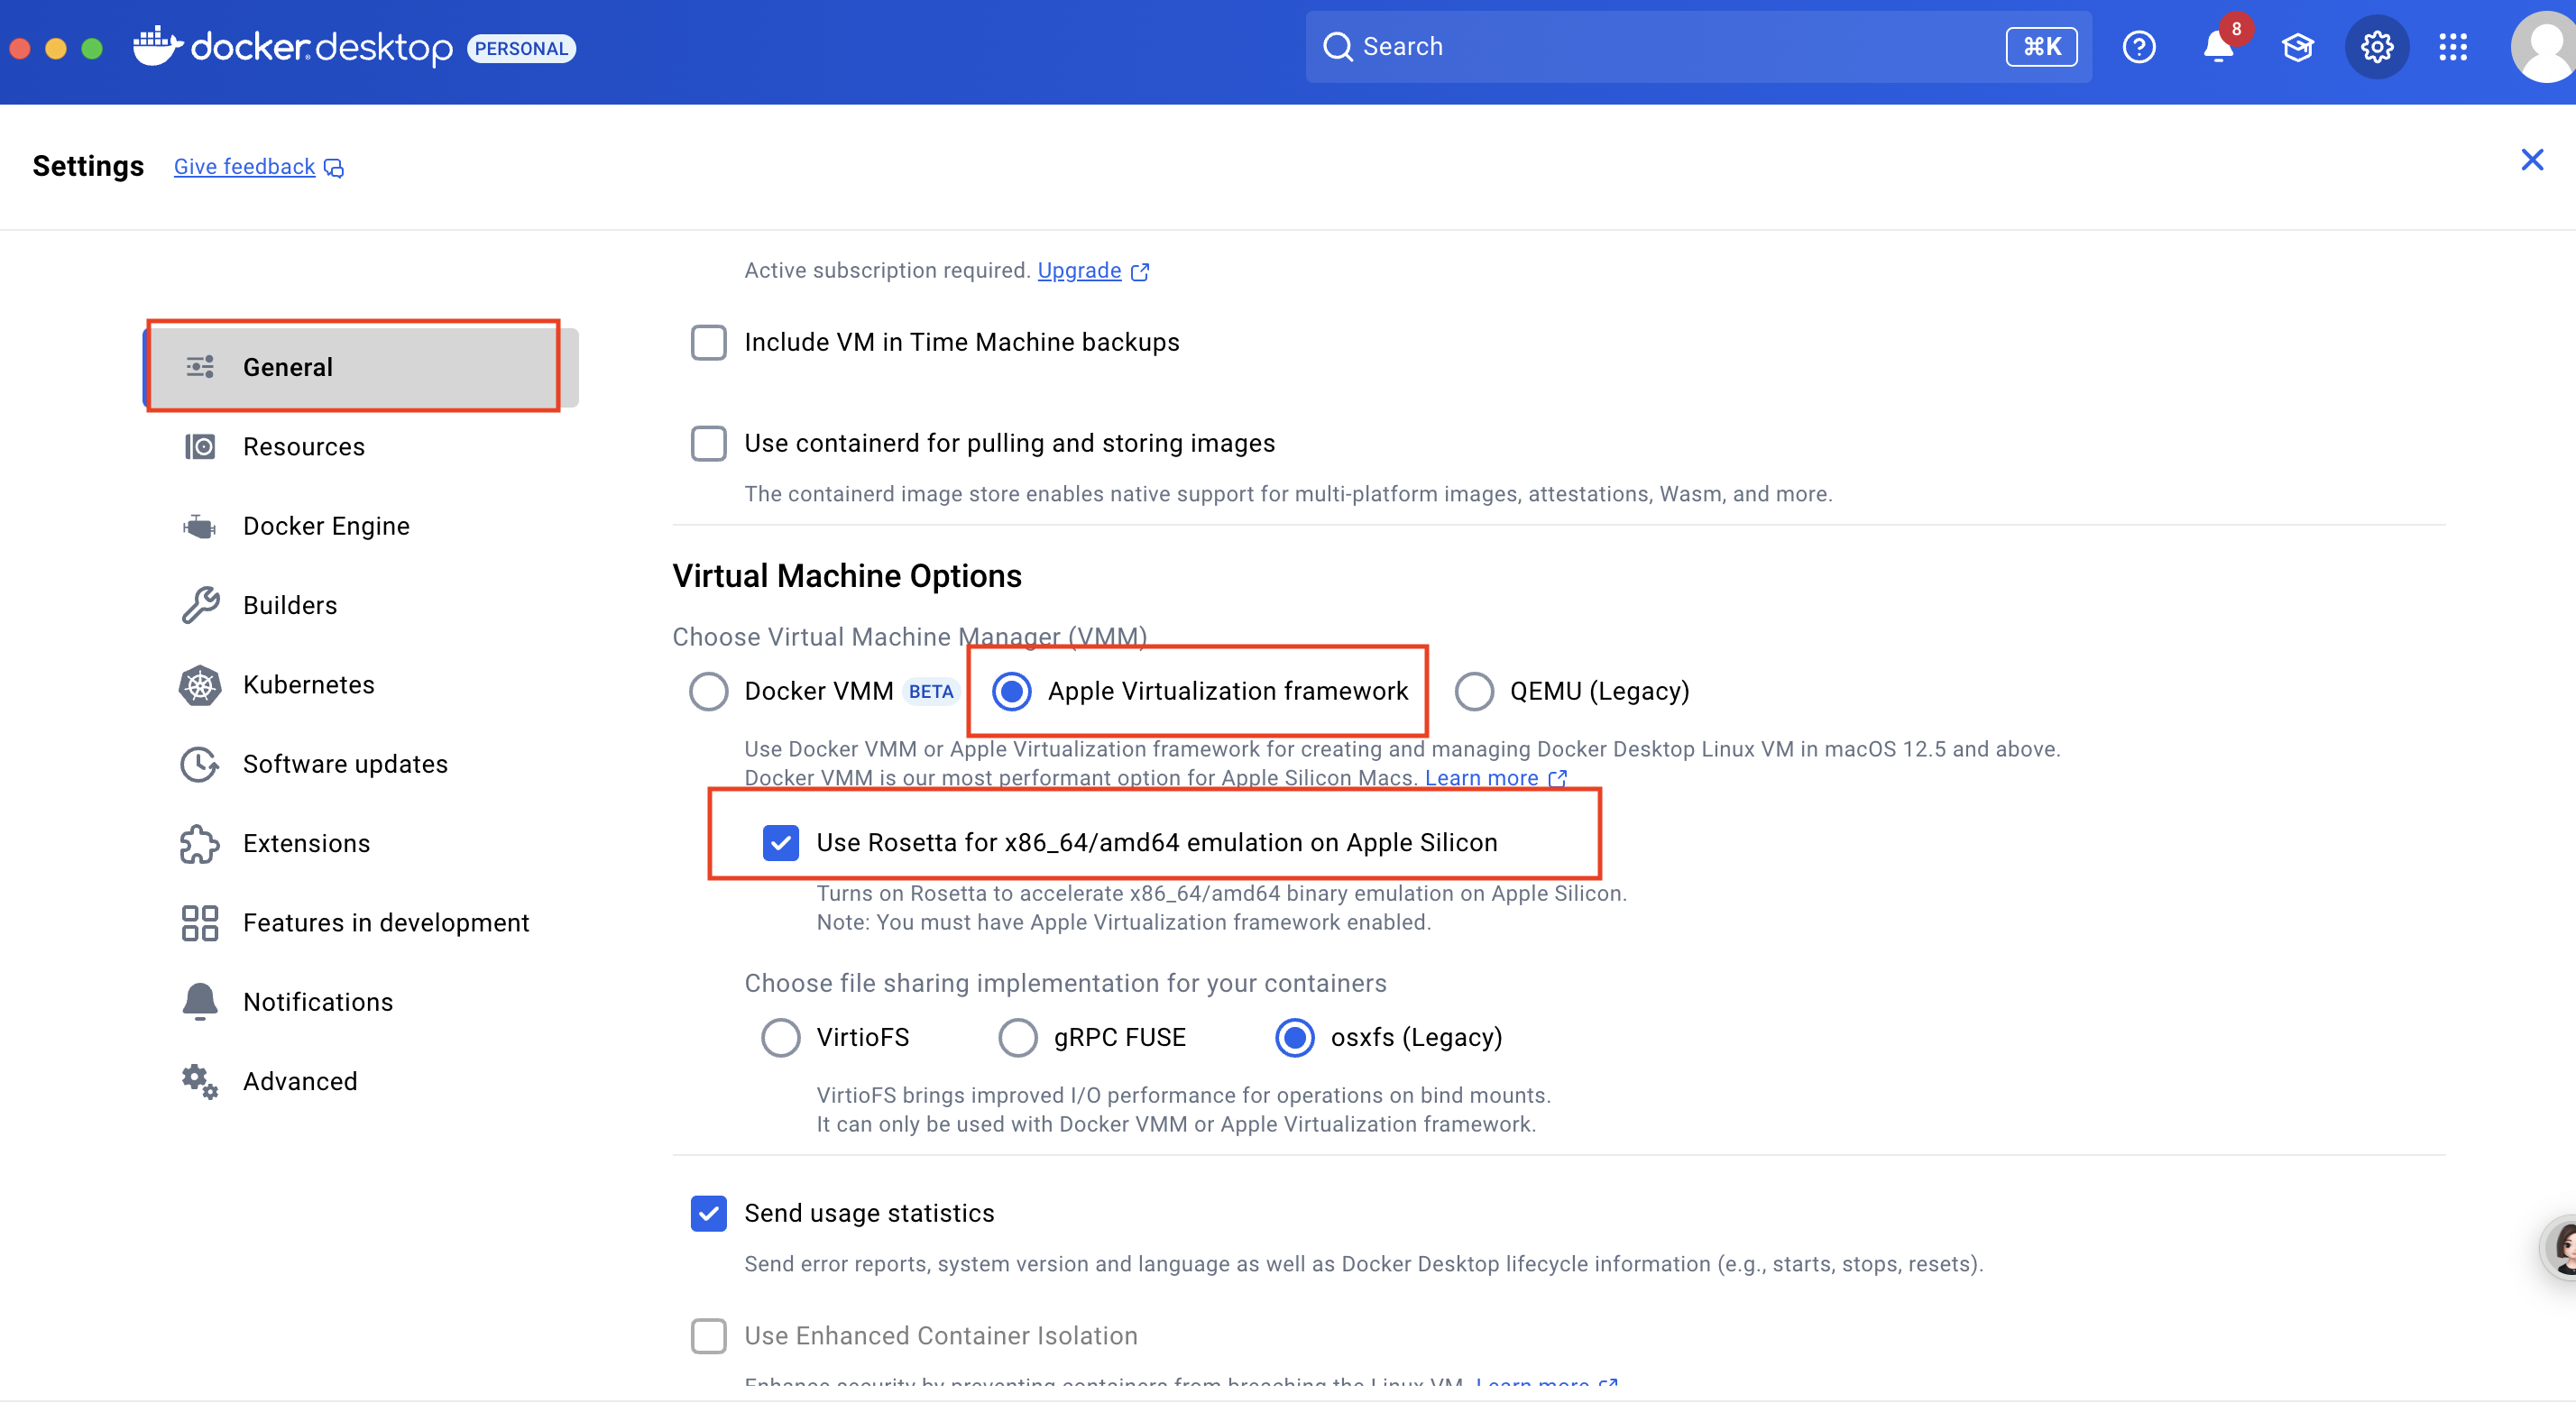
(2)打开docker desktop,并在设置/General中
选择:Virtual Machine Options/Apple Virtualization framework/Use Rosetta for x86/amd64 emulation on Apple Silicon 选项

description

(3)重启docker desktop后,选择任何一个linux镜像,再次运行

docker image inspect <image_name> | grep Architecture

显示架构若为x86 AMD字样,则成功

5. 下载并运行vnpy40镜像

(1) 建立本地与容器共享文件夹(其中vnpy_docker可替换为自定义文件夹名)

cd ~
mkdir vnpy_docker

(2) 通过docker run指定芯片架构参数--platform,下载并运行安装镜像,并设定宿主机~/vnpy_docker(可替换为自己自定义文件夹)与容器共享shareVolume文件夹(其中-pc参数中的端口号81,8828可替换为自定义期望的vnpy vnc和jupyter lab运行的端口):

docker run -d -p 81:80 -p 8828:8888 \
 --platform=linux/amd64 \
 -it --name vnpy40 \
 -v ~/vnpy_docker:/shareVolume \
 --restart=always \
 dehim/veighna

(3) 在容器内将demo文件夹移动到shareVolume文件夹

mv /shareVolume_demo/* /shareVolume/

(4) 在宿主机,重启容器

docker restart vnpy40

6. 在浏览器端运行vnpy和jupyter lab

(1)jupyter lab 初始化
进入容器终端,查询jupyterlab的token,以便设置密码

jupyter server list

终端显示:(以下<token>即具体的token码,实际由hash码构成)
Currently running servers:
http://541d66a60696:8888/?token=<token> :: /
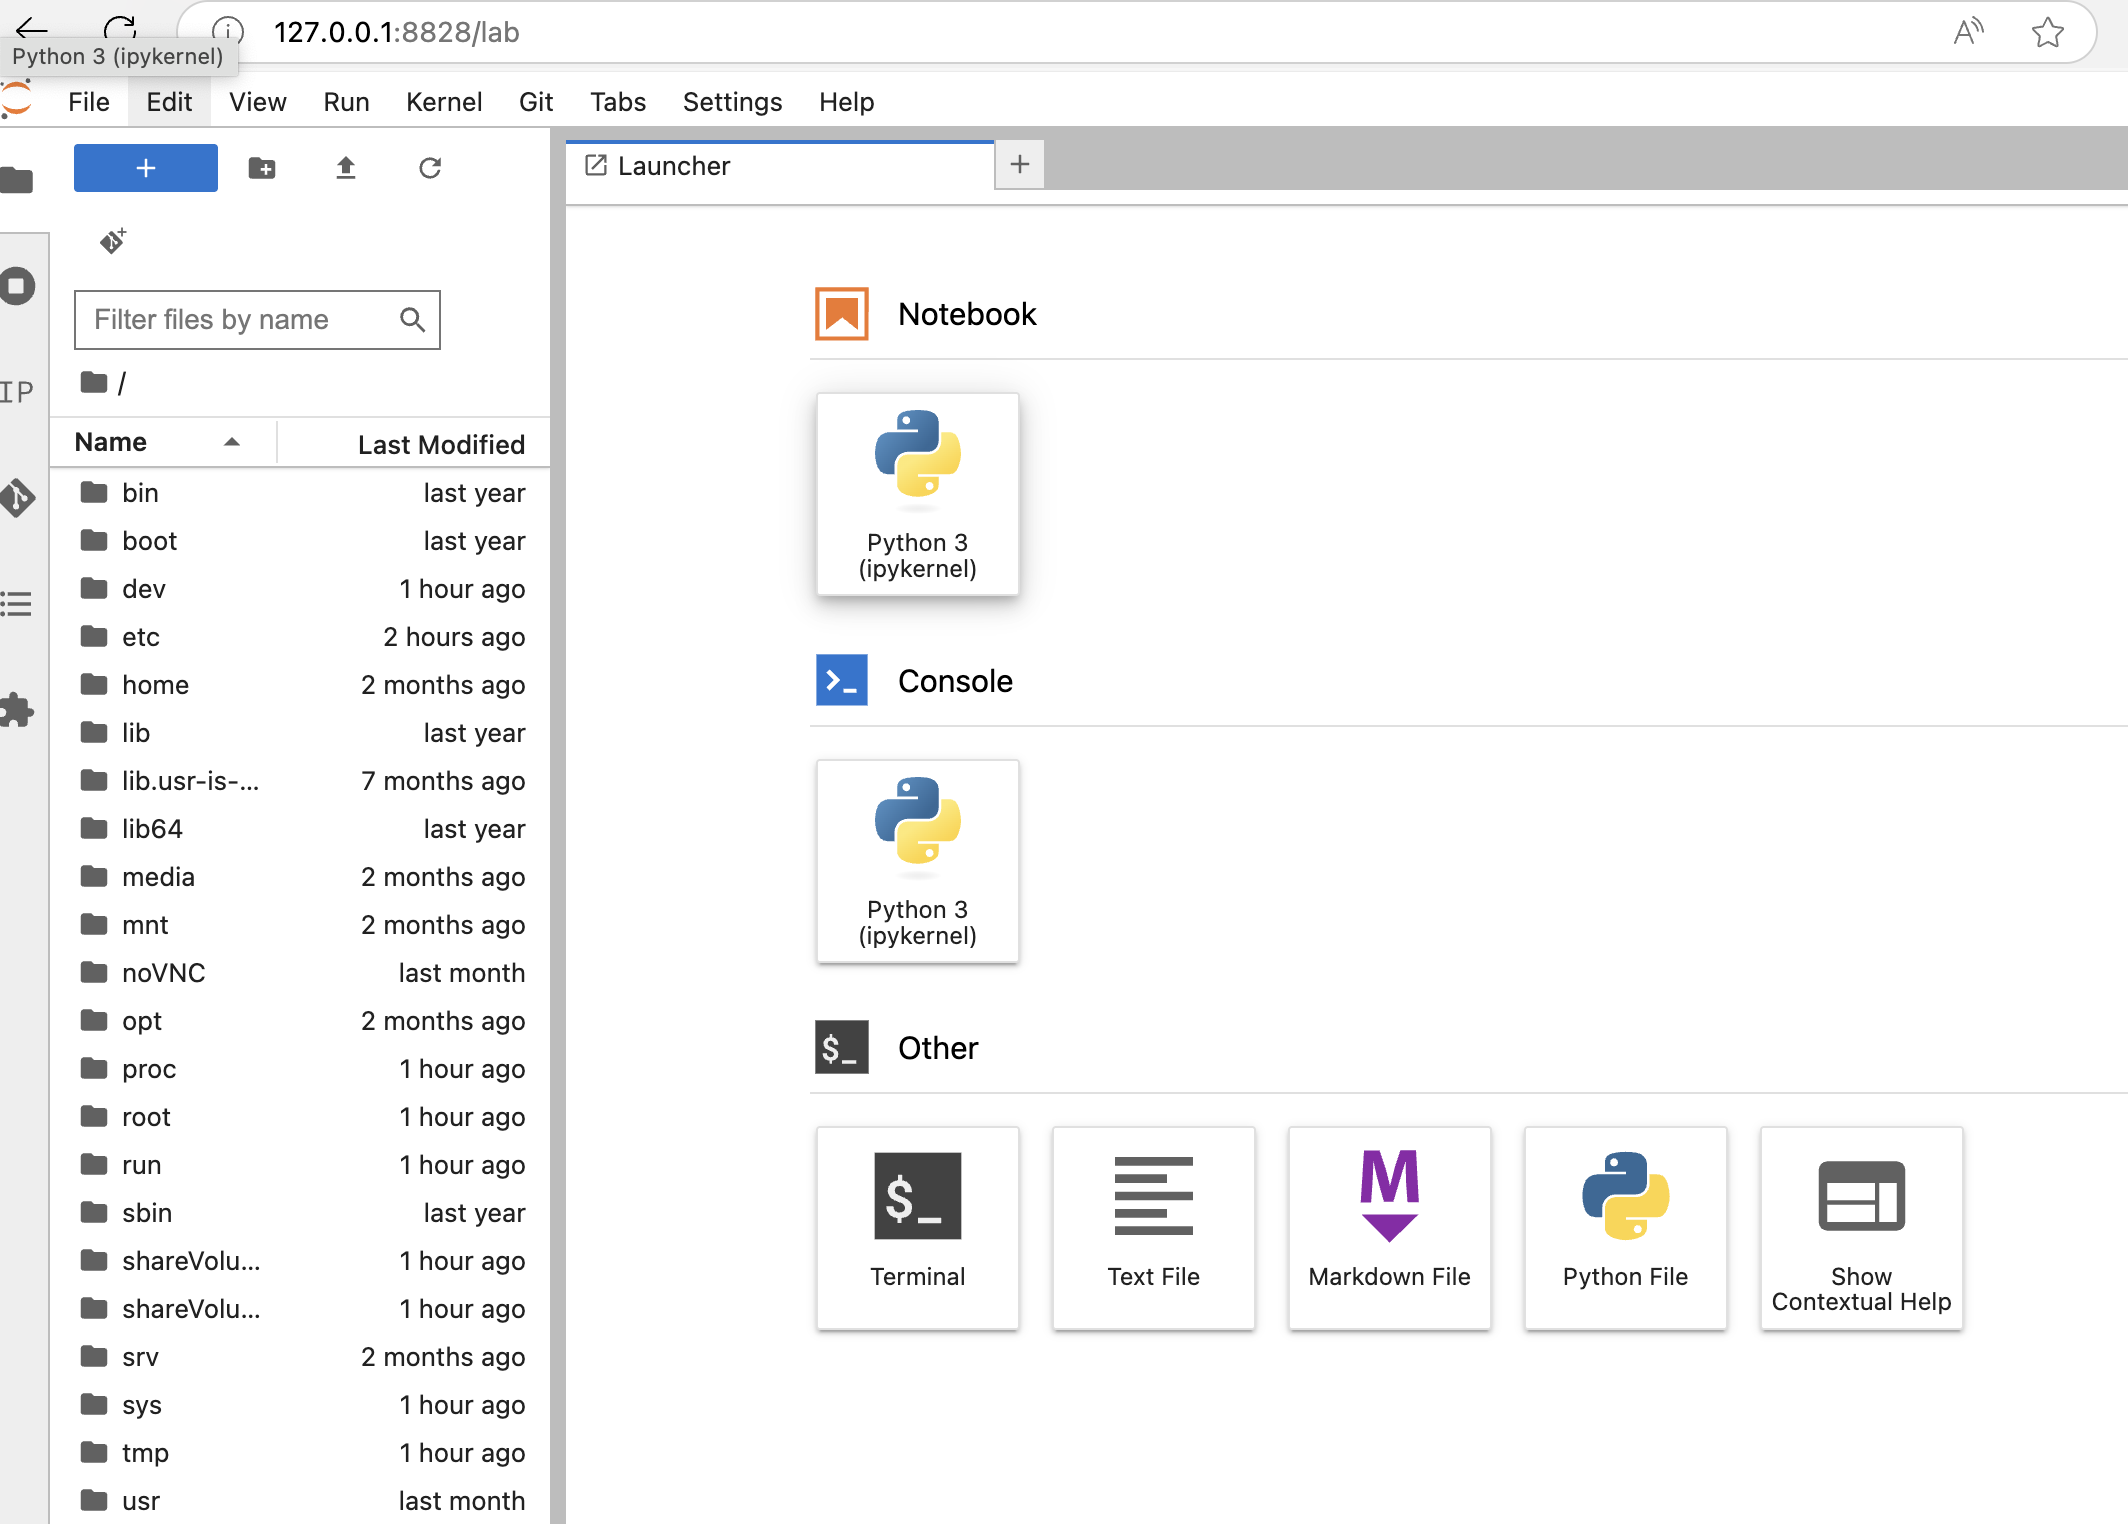
(2)在宿主机edge浏览器地址中输入<token>,并输入登录jupyter lab 密码:
浏览器中登录:

http://127.0.0.1:8828/lab

在初始化页面的token中输入<token>,并设置登录密码,即可进入jupyter lab
description

(3)有UI界面运行vnpy noVNC界面启动
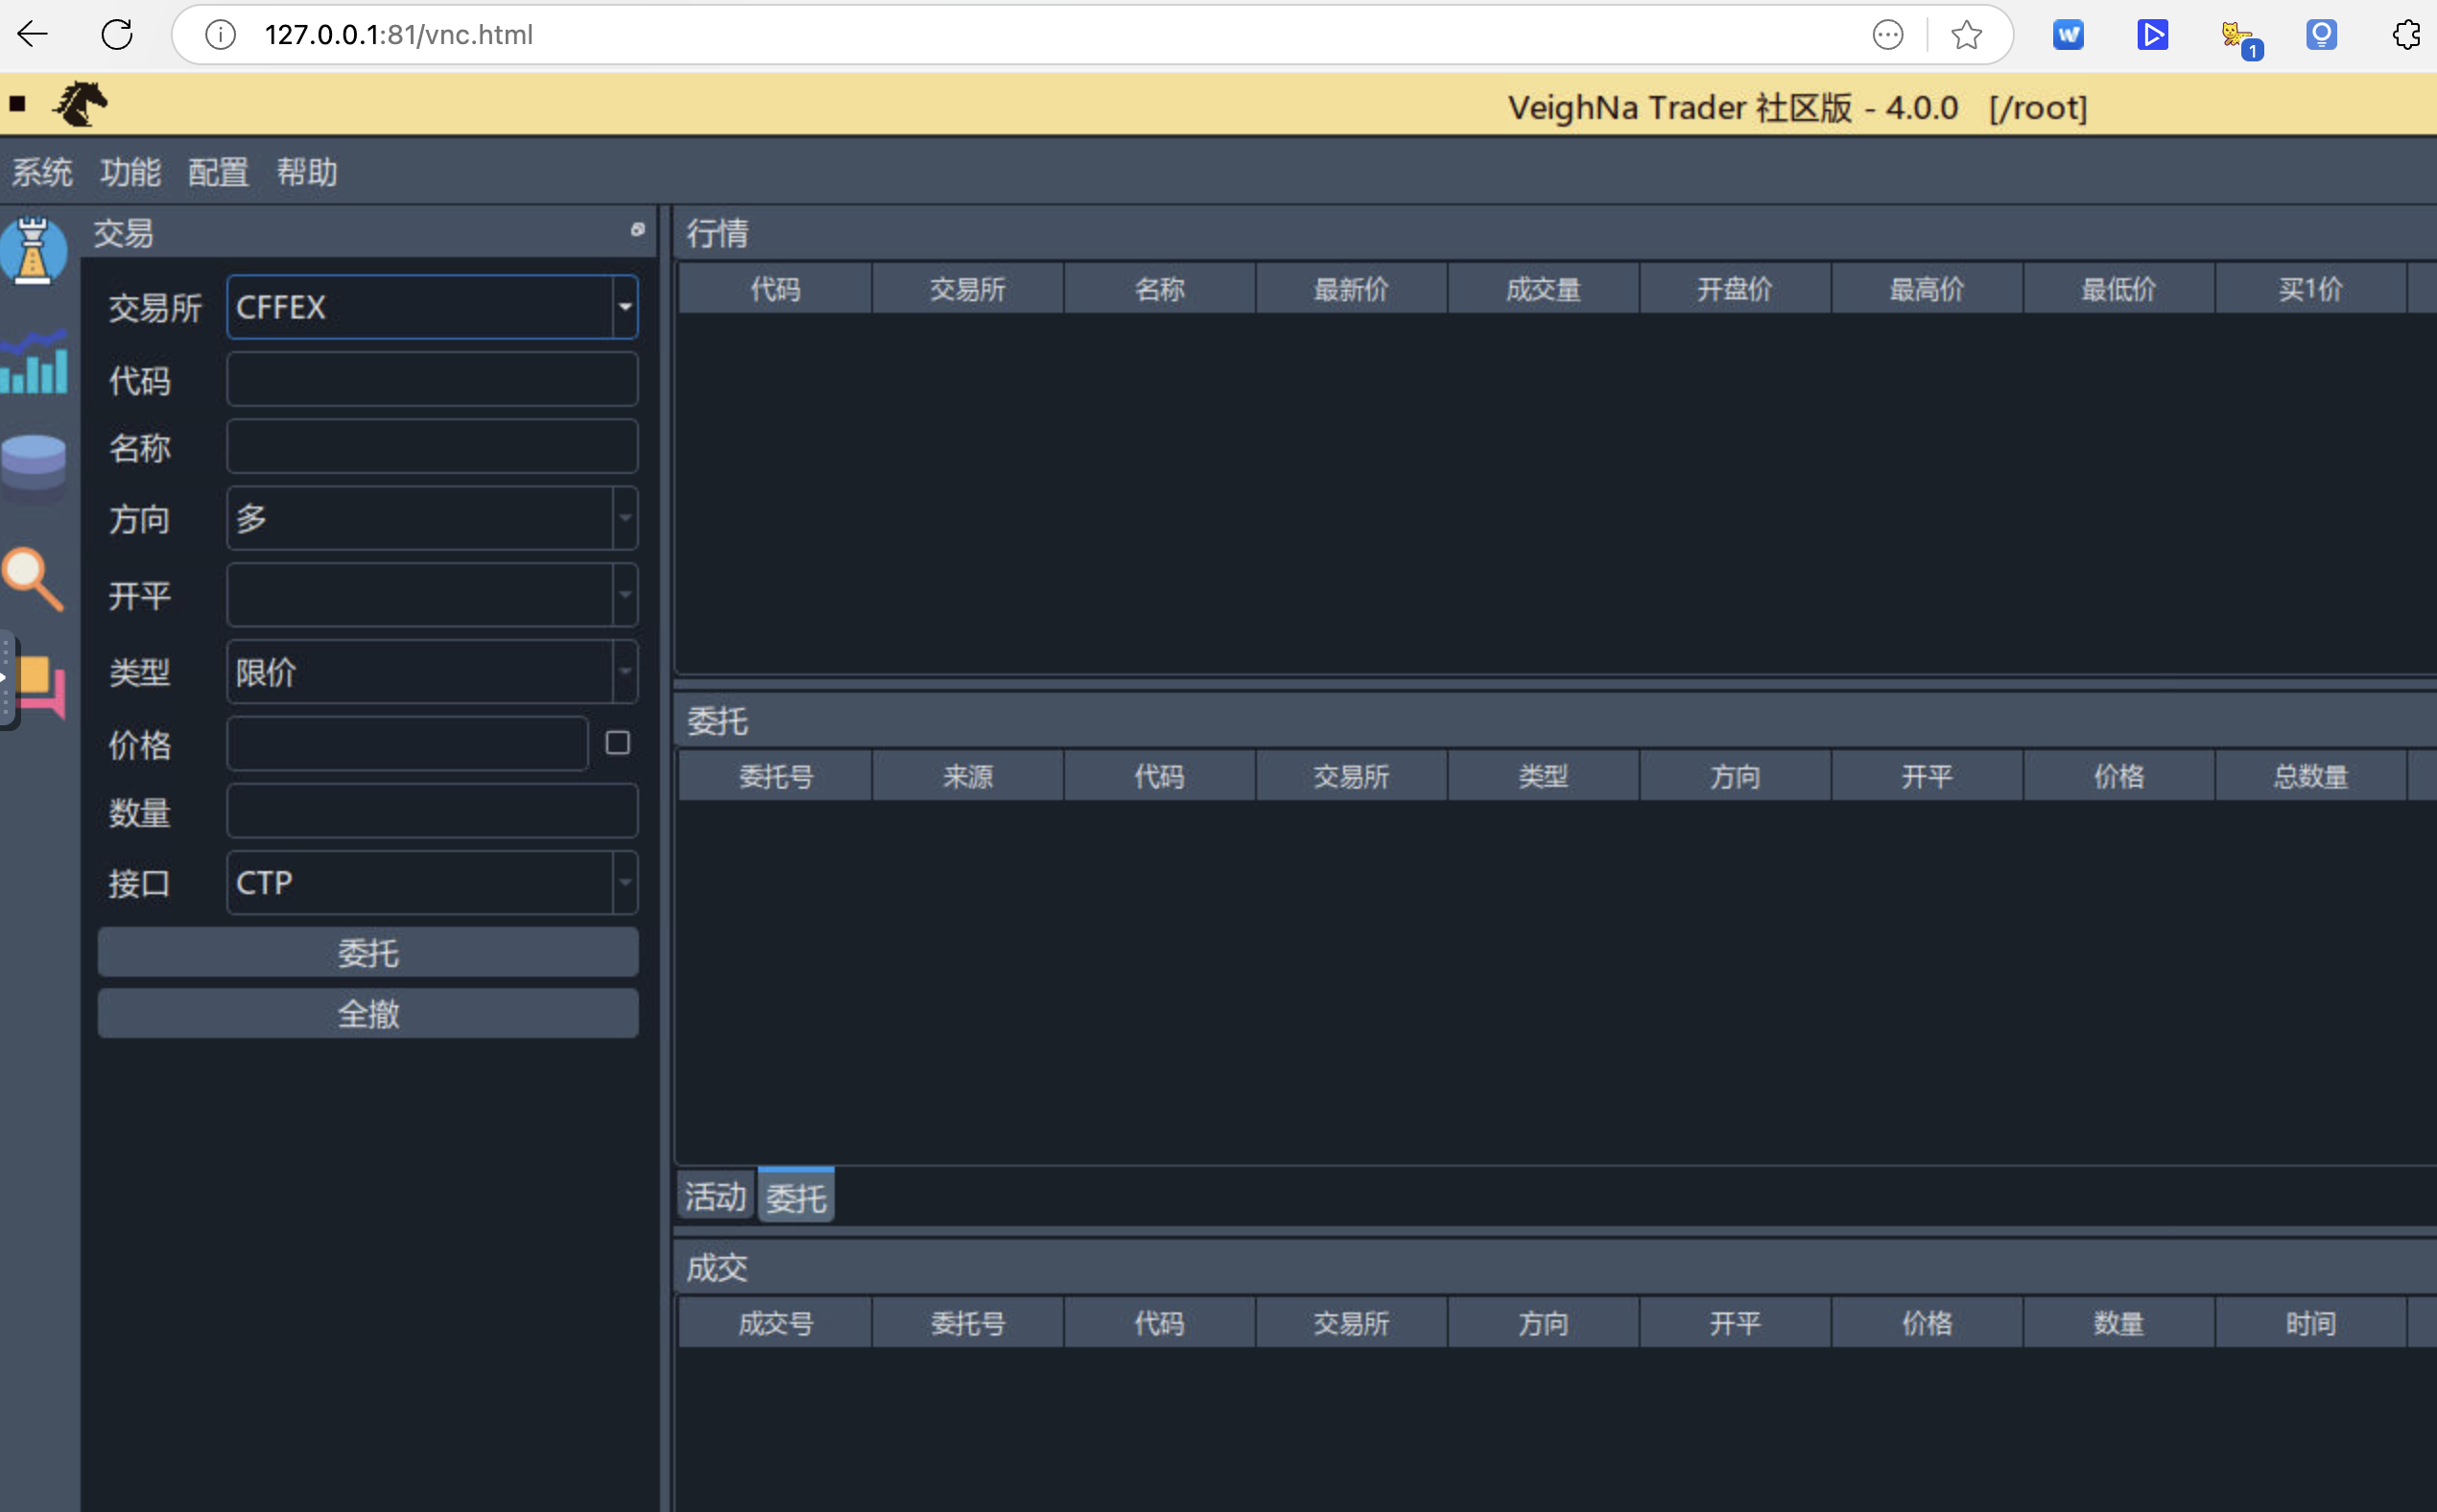
镜像采用noVNC解决方案(官网:http://novnc.com )即通过h5浏览器js脚本形式实现vnc在浏览器(不支持IE内核外其它大多数内核)访问vnpy的窗口界面。在宿主机edge浏览器地址中输入:

http://127.0.0.1:81/vnc.html

初始密码为:1234,
即可以vnc网页方式访问vnpy窗口界面。

description

(4) 若需要设置修改noVNC密码,可以登录容器,并采用:(其中<密码>可以修改为登录noVNC的密码)

x11vnc -storepasswd <密码> ~/.vnc/passwd

7. 说明

(1)vnpy的重要文件夹:
vnpy所在目录:
• vnpy包(含alpha等子目录):/usr/local/lib/python3.12/dist-packages/vnpy
• vnpy主目录(包含examples):/shareVolume_demo/config/vnpy

(2)验证方法
在容器启动的状态下,运行

docker exec vnpy40 ls -la /shareVolume_demo/config/vnpy

可查询veighNa安装的主要文件。
可以运行以下命令查询已经安装的vnpy模块。

pip list

Thanks to the AI reply above, which is basically correct. The best practice follows this direction, and after my personal testing, it is improved as follows:

Guide to Deploy the Latest Unofficial Image of VeighNa 4.0 on MacOS with M - series Chips

1. Problem:

how to deploy the VeighNa 4.0 Docker image for AMD x86 architecture on macOS with M-series chips (ARM64 architecture, commonly found in most current Apple laptops) and run the VeighNa 4.0 Docker image in x86 emulation mode?

2. Necessity of using x86 architecture VeighNa image:

  • Why VeighNa 4.0 image?
    VeighNa 4.0 includes the alpha factor trading module, which is not available in other versions. Since there is currently no official VeighNa 4.0 image, third-party or DIY solutions must be adopted.
  • Why use x86 architecture?
    Without considering reverse-compilation of .so files, there is no direct solution for creating an ARM architecture image. When installing TA-lib and compiling C++ modules like VeighNa, chip architecture must be considered. Specifically, the dynamic link libraries (DLLs) in the official CTP API module — libthosttraderapi_se.so and libthostmduserapi_se.so under github.com/vnpy/vnpy_ctp/vnpy_ctp/api/ — are from the Shanghai Futures Exchange's official API and are x86-based. Since the official ARM architecture DLLs are not released, directly using pip install on ARM architecture during image creation will cause installation failures.

3. Problem confirmation: (taking a macOS M3 chip laptop as an example):

Query the chip architecture on the host machine:

uname -a

It will display the host's CPU architecture.

Query the chip architecture inside the container: (use a runnable image <image_name> for query)

docker image inspect <image_name> | grep Architecture

It will also display the container's CPU architecture.
The difference between the host's and container's architecture indicates a mismatch between Docker's chip architecture and the image's chip architecture, requiring a compatible running method. In fact, simply using Rosetta built into macOS M-series chips can achieve the goal of running x86 programs on M-series arch chips.

4. Set up Docker to support multi-architecture on macOS

(1) Install the macOS M-chip version of Docker Desktop and complete user registration and login.
(2) Open Docker Desktop, go to Settings > General, then:
Select Virtual Machine Options > Apple Virtualization framework > Use Rosetta for x86/amd64 emulation on Apple Silicon.
description
(3) After restarting Docker Desktop, select any Linux image and run again:

docker image inspect <image_name> | grep Architecture

If the output shows "x86 AMD" in the architecture field, the setup is successful.

5. Download and run the VeighNa 4.0 Image

(1) Create a shared folder between the local machine and the container (where vnpy_docker can be replaced with a custom folder name).

cd ~
mkdir vnpy_docker

(2) Use docker run with the chip architecture parameter --platform to download and run the installation image. Additionally, configure the host machine's ~/vnpy_docker directory (replaceable with your own custom folder) to share the shareVolume folder with the container. (Note that the port numbers 81 and 8828 in the -p parameter can be replaced with custom ports as desired for running VNPY VNC and Jupyter Lab.):

docker run -d -p 81:80 -p 8828:8888 \
 --platform=linux/amd64 \
 -it --name vnpy40 \
 -v ~/vnpy_docker:/shareVolume \
 --restart=always \
 dehim/veighna

(3) Move the demo folder to the shareVolume folder inside the container.

mv /shareVolume_demo/* /shareVolume/

(4) restart container on the host:

docker restart vnpy40

6. run VNPY and Jupyter Lab in Edge explorer

(1)jupyter lab initial page
Enter the container terminal and query the JupyterLab token to set a password.

jupyter server list

The terminal displays: (The following <token> is the specific token code, which is actually composed of a hash code)
Currently running servers:
http://541d66a60696:8888/?token=<token> :: /
(2)In the address bar of the Edge browser on the host machine, enter the URL with the <token> and then set a password for logging into Jupyter Lab.
login on explorer:

http://127.0.0.1:8828/lab

On the initialization page, enter the <token> in the token field, set a login password, and you will be able to access Jupyter Lab.
description

(3)Launch the VNPY noVNC interface with a UI.
The image uses the noVNC solution (official website: http://novnc.com), which implements VNC access to the VNPY window interface via a browser (most kernels are supported except for the IE kernel) through an H5 browser JavaScript script. Enter the following in the address bar of the Edge browser on the host machine:

http://127.0.0.1:81/vnc.html

description

The initial password is: 1234.
You can then access the VNPY window interface via the VNC web page.
(4) If you need to modify the noVNC password, you can log in to the container and use: (where <password> can be changed to the login password for noVNC)

x11vnc -storepasswd <密码> ~/.vnc/passwd

7. Instructions

(1) Important Folders of vn.py
vn.py directory:
• vn.py package (including alpha subdirectory): /usr/local/lib/python3.12/dist-packages/vnpy
• vn.py main directory (including examples): /shareVolume_demo/config/vnpy
(2) Verification Methods
When the container is running, check main installation files of VeighNa on host:

docker exec vnpy40 ls -la /shareVolume_demo/config/vnpy

Also, in the container, you can query installed vn.py modules with:

pip list
© 2015-2022 上海韦纳软件科技有限公司
备案服务号:沪ICP备18006526号

沪公网安备 31011502017034号

【用户协议】
【隐私政策】
【免责条款】