VeighNa量化社区
你的开源社区量化交易平台
Member
avatar
加入于:
帖子: 19
声望: 0

两周前,刚刚把电脑系统升级到ubuntu20.04 系统。 以前用的WIN10 /ubuntu 18.04 双系统。在ubuntu18.04升级到20.04系统时出现意外故障,干脆把ubuntu18.04 彻底卸载,重新装了最新版ubuntu 20.04系统。目前采用win10/ubuntu20.04 双系统。

说起VNPY, 其实大约两三年前接触过,不过因为本人python 的基础比较差。加之对事件驱动引擎原理也不太懂,模块之间调来调去,直接绕晕了,于是很快放弃了。 实盘一直用TB进行交易。前一段时间看到一篇文章,介绍用VNPY进行回测和实盘交易的几个策略,文章很不错。加上因为在使用TB 过程中,一直受困于一些策略的细节处理上难以实现,于是又勾起了对VNPY的兴趣。

问题来了,我刚刚装的ubuntu20.04 系统,VNPY 能否支持?另外我的python 3.8.2 版本能否支持?即使安装成功,能否顺利运行?

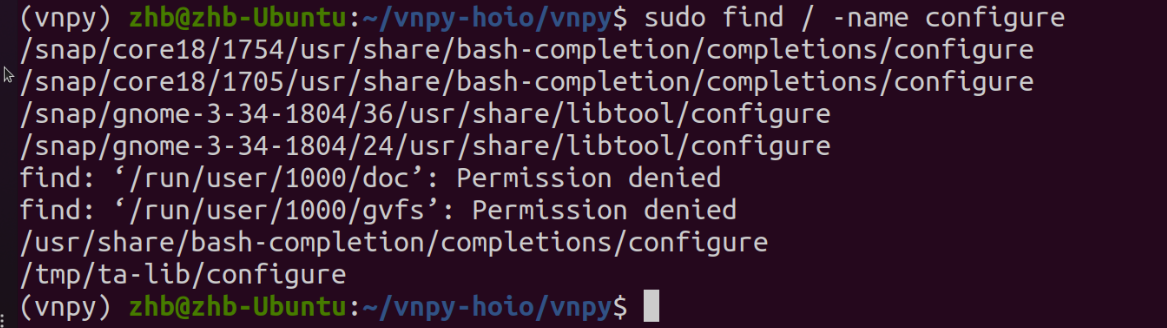
带着疑问,网上搜了下,VNPY 最新版本已经更新到2.1.3。 从github 上下载源码vnpy-2.1.3.tar.gz ,解压后运行安装命令 bash install.sh,直接跳出错误提示,后来google上搜索尝试了很多办法,还是无法正确安装。本来截了好多图,后来一看不知什么原因都没有保存下来。
6/10最新更新: 本部分内容本来是make 编译安装的内容,因为几个同学反应make编译方式不能安装。 我重新新建了一个目录试了一次,确实在源码解压和安装过程出现不能安装的奇怪的问题。后来我又尝试了一次bash install.sh, 这次bash install.sh 虽然还是出现了几个类似的错误,但根据错误提示内容,解决方法可以参照下面出现错误提示的解决办法, 最终可以安装成功!

因为对系统,环境的要求,不要再尝试make 编译安装,我会再继续研究尝试。请使用原说明中的bash install.sh安装方法!如给各位带来不便,表示歉意!

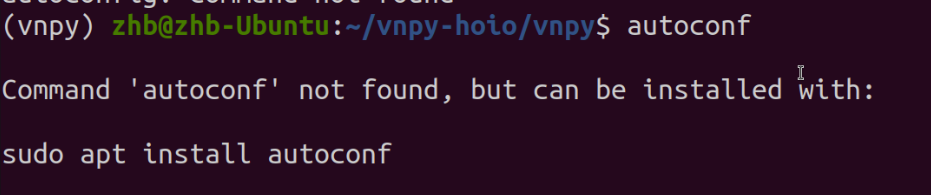
安装过程中可能会跳出一些错误提示,比如我的电脑运行时就跳出一些包/模块的版本兼容问题。

ERROR: pyasn1-modules 0.2.8 has requirement pyasn1<0.5.0,>=0.4.6, but you'll have pyasn1 0.4.2 which is incompatible.
ERROR: tigeropen 1.2.0 has requirement pandas==0.24.2, but you'll have pandas 1.0.3 which is incompatible.
ERROR: tigeropen 1.2.0 has requirement python-dateutil==2.8.1, but you'll have python-dateutil 2.7.3 which is incompatible.
ERROR: tigeropen 1.2.0 has requirement simplejson==3.17.0, but you'll have simplejson 3.16.0 which is incompatible.
ERROR: tigeropen 1.2.0 has requirement six==1.13.0, but you'll have six 1.14.0 which is incompatible.

解决办法是直接terminal依次运行pip安装符合版本要求的模块,版本低的直接升级,版本高的就指定版本:
pip install --upgrade pyasn1
pip install pandas==0.24.2
pip install --upgrade python-dateutil
pip install --upgrade simplejson
pip install six==1.13.0

更新完上述包/模块后,重新运行bash install.sh:
然后就可以看到提示:
Successfully installed PyCryptodome-3.9.7 QScintilla-2.11.4 babel-2.8.0 cycler-0.10.0 deap-1.3.1 delorean-1.0.0 docopt-0.6.2 enum34-1.1.6 futu-api-3.21.0 helpdev-0.7.1 humanize-2.4.0 kiwisolver-1.2.0 matplotlib-3.2.1 mongoengine-0.20.0 peewee-3.13.3 protobuf-3.5.1 psycopg2-binary-2.8.5 pyasn1-0.4.2 pymongo-3.10.1 qdarkstyle-2.8.1 rsa-4.0 scipy-1.4.1 seaborn-0.10.1 stomp.py-4.1.22 tigeropen-1.2.0 tzlocal-2.1 vnpy-2.1.3

可以看到安装成功的包和模块,VNPY -2.1.3压轴,至此,安装大功告成!

运行一下看看。

按照说明,打开Terminal, 进入vnpy-2.1.3/examples/vn_trader目录, 编辑器打开run.py(我用的IDE是pycharm). 根据需要加载相应的功能,其实原文件里都列出来了,直接uncomment就行. 我的run.py 内容:
from vnpy.event import EventEngine

from vnpy.trader.engine import MainEngine
from vnpy.trader.ui import MainWindow, create_qapp
from vnpy.gateway.ctp import CtpGateway
from vnpy.app.cta_strategy import CtaStrategyApp
from vnpy.app.cta_backtester import CtaBacktesterApp

def main():
""""""
qapp = create_qapp()
event_engine = EventEngine()
main_engine = MainEngine(event_engine)
main_engine.add_gateway(CtpGateway)
main_engine.add_app(CtaStrategyApp)
main_engine.add_app(CtaBacktesterApp)
main_engine.add_app(PortfolioStrategyApp)
main_window = MainWindow(main_engine, event_engine)
main_window.showMaximized()

qapp.exec()

if name == "main":
main()

保存文件,然后terminal 直接运行python run.py

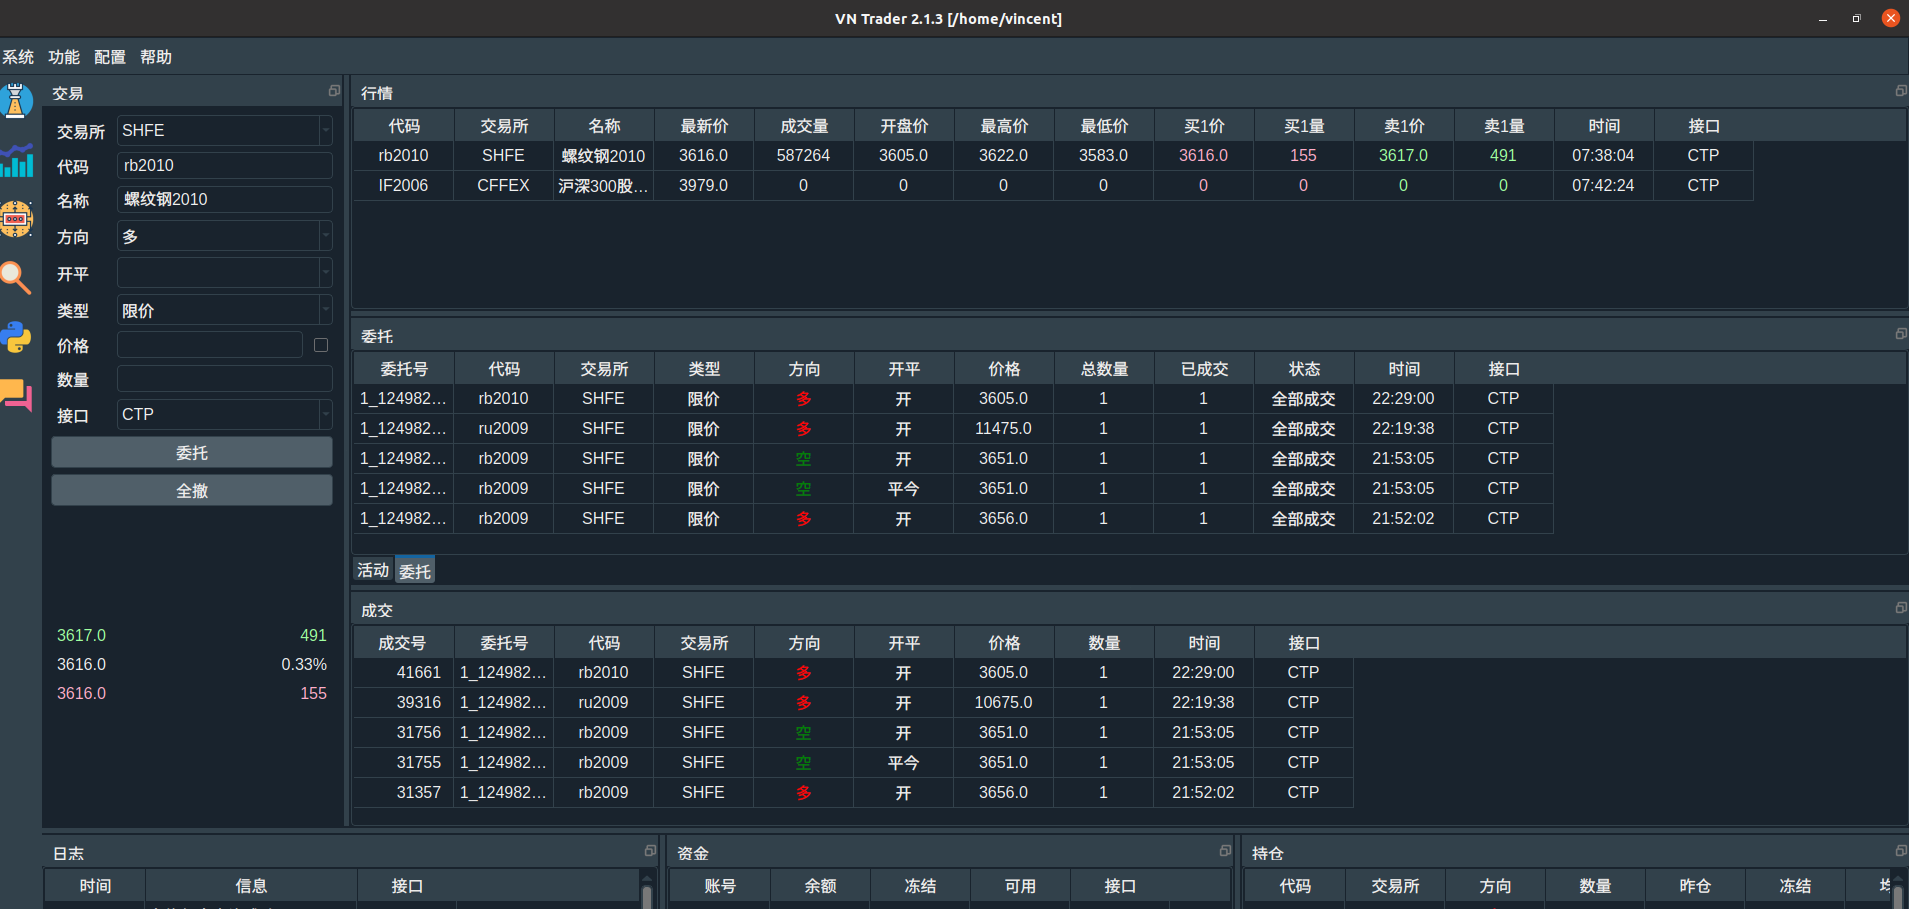
下图是成功打开后的主界面, 按照说明输入simnow 账号信息,连接CTP。 订阅了股指和螺纹钢等合约的价格,然后加载了几个策略(系统自带)的模拟交易。

description

CTA 策略界面

description

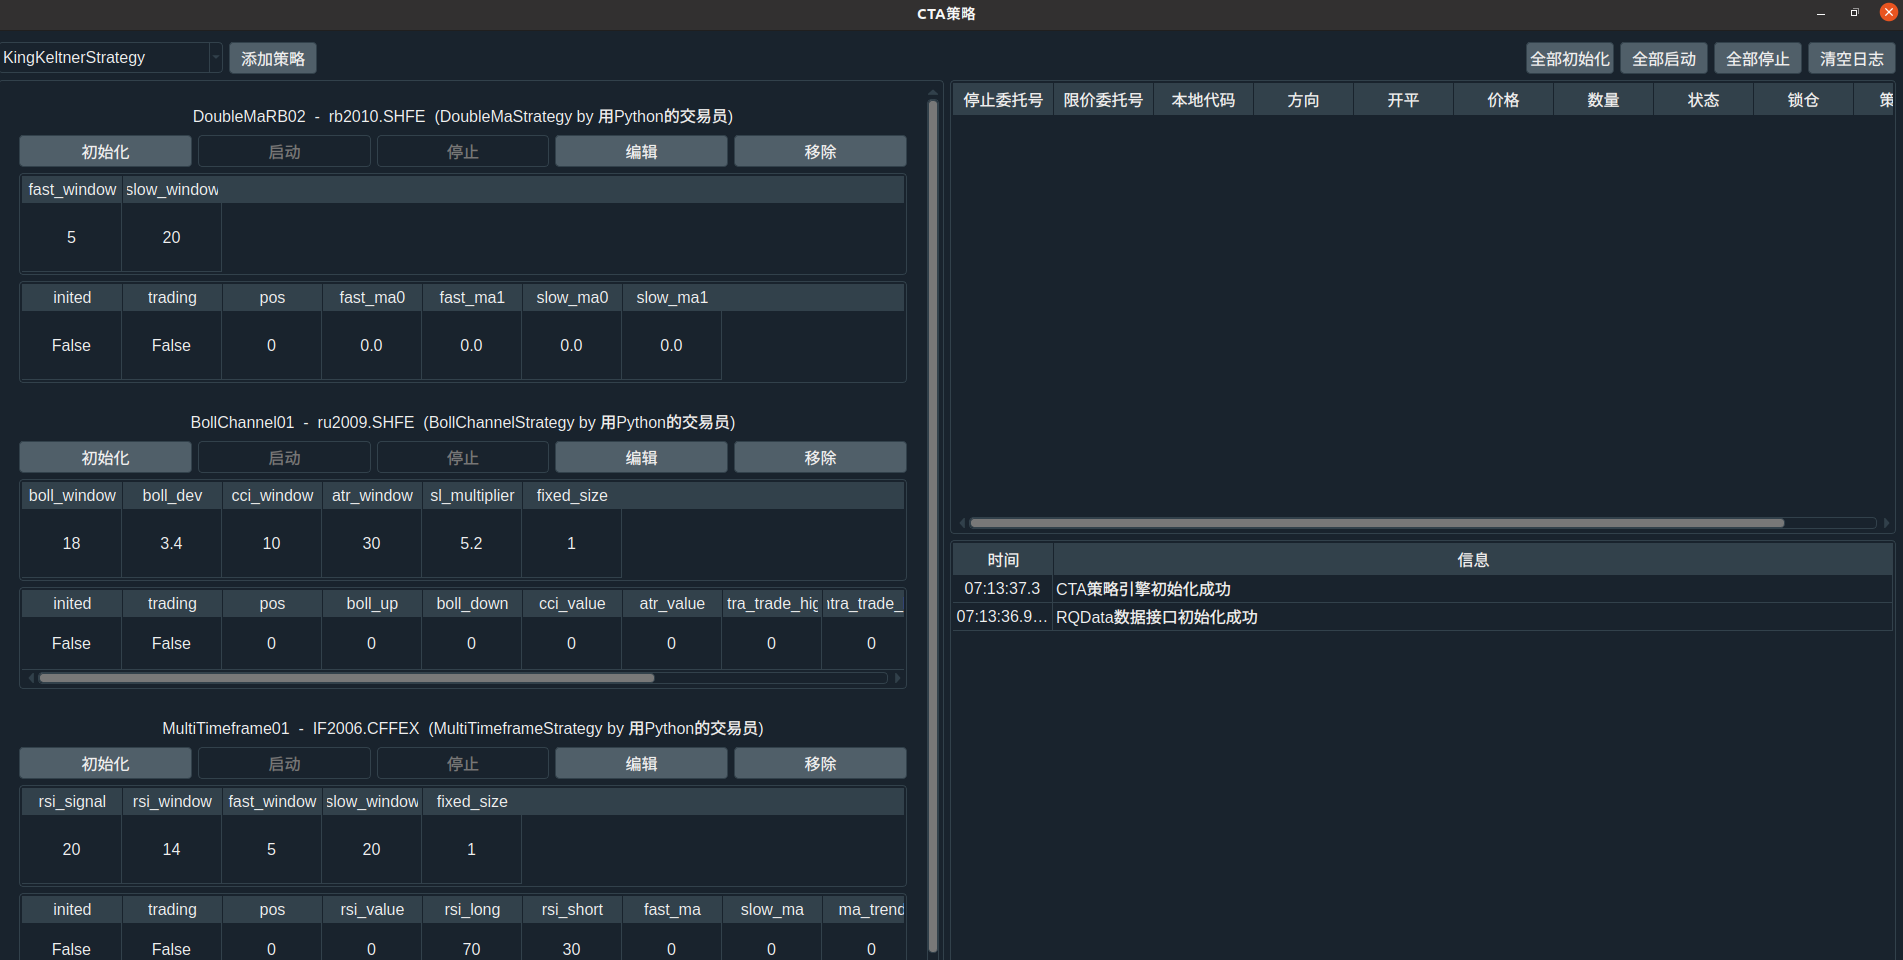
加载策略直接按照说明,设定参数,选择品种,一步步操作,非常方便。

试了一下回测功能:

description

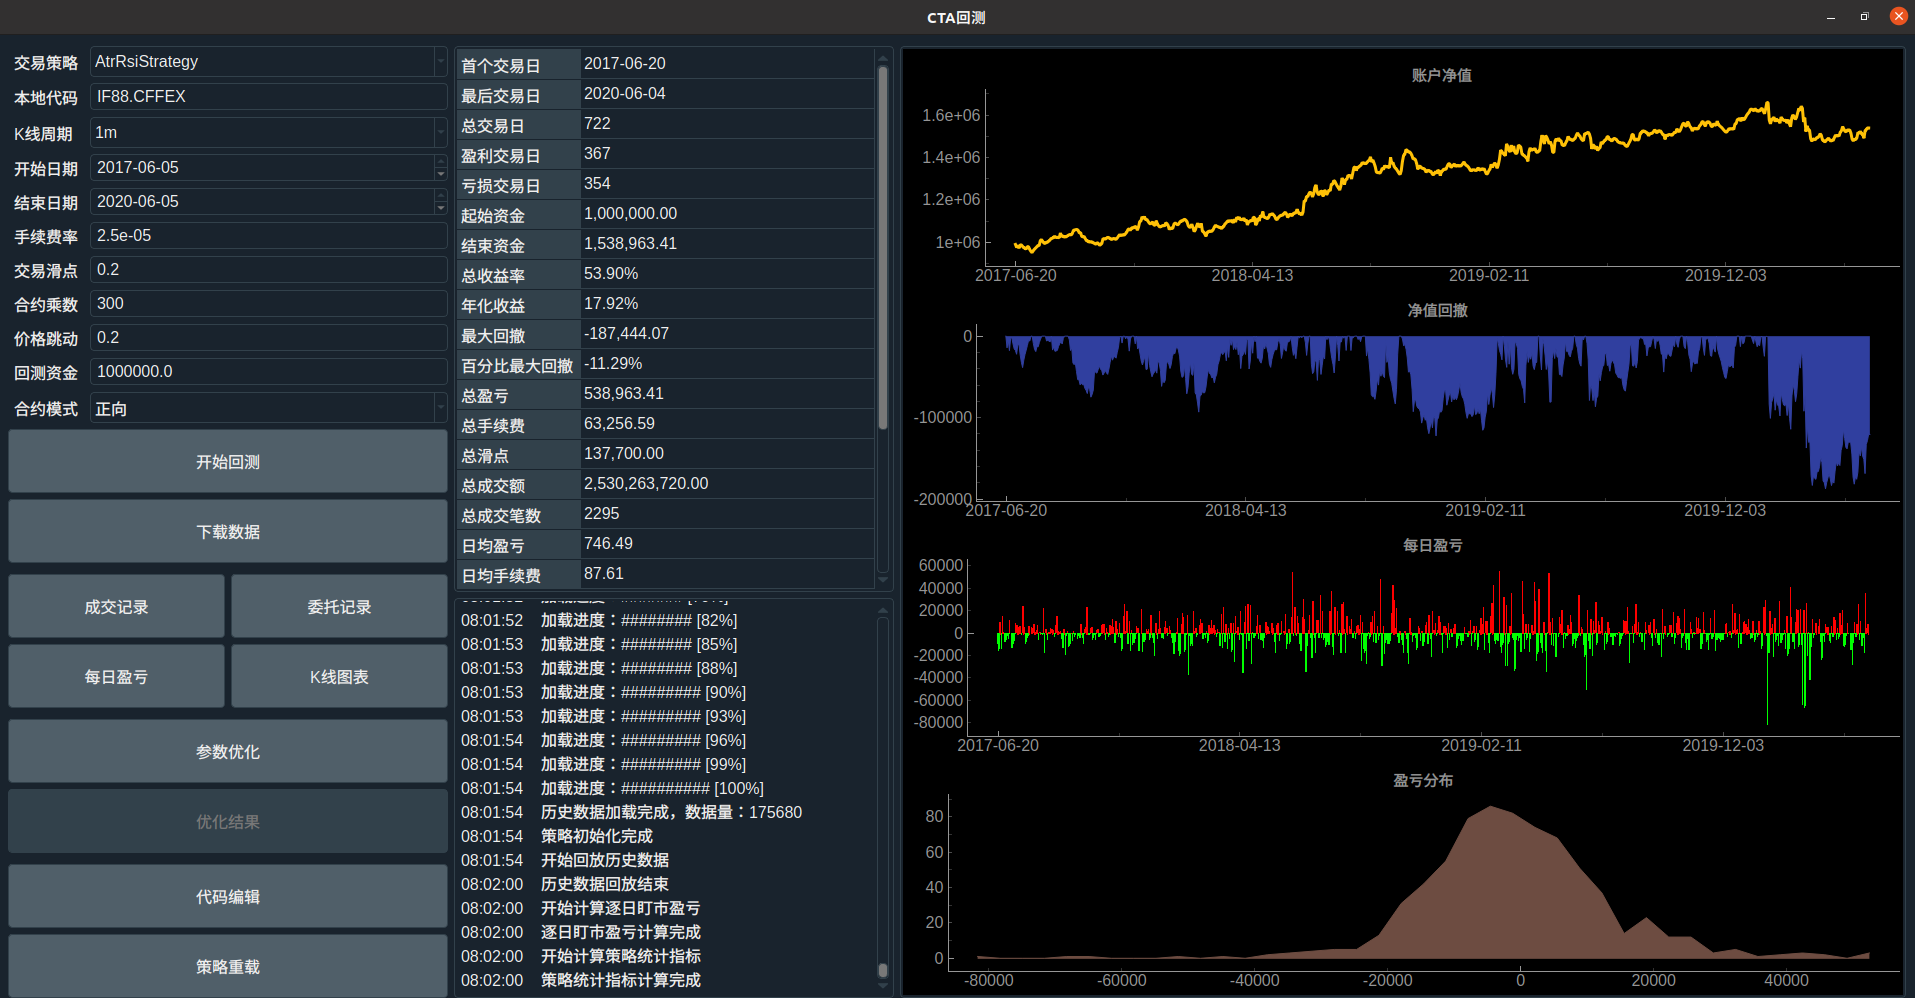
我的回测数据,一部分是自己在TB 下载的csv历史行情数据按照要求的格式上传到本地mongoDB 服务器,另外一部分是刚刚申请试用的RQdata 账号由VNPY软件默认下载保存到sqlite 数据库。 因为对数据的下载,保存和调用路线还不是很清楚,后面慢慢研究学习一下。

其它功能应用模块后面继续摸索。

在使用过程中也遇到几个问题,不知如何解决:
1,模拟盘在停止一个策略后,账户里已经成交的订单是如何处理的。 我原来的理解是应该直接自动平仓。但停止一个策略后好像成交的订单还在。需要手动处理么?

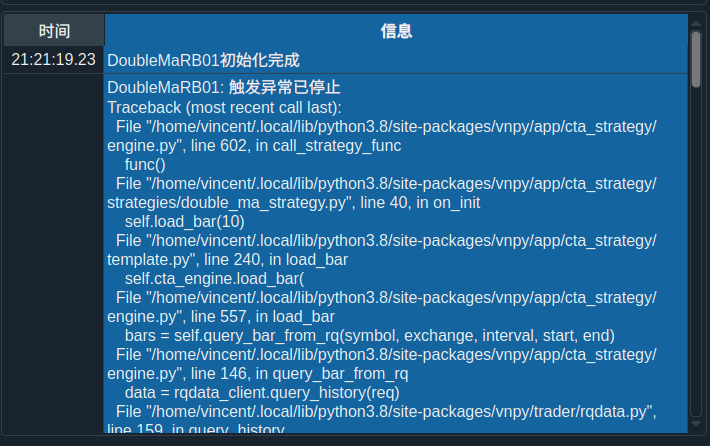
2,策略界面出现的异常信息显示不全,边上的滚动条也无法拉到显示底部的信息。不知怎么操作?如下图:

description

3,主界面的委托价格出现明星的错误价格,不知怎么回事, 见下图,橡胶的委托价怎么会冒出来奇怪的11475? 当前最新价格 10655,high/low 是10740/10600, :

description

4, 还有其他几个主界面操作的小问题,估计是本人因为不熟悉操作界面,待摸索。

几点说明:

1,本来在安装软件的过程中截了很多图,有图的话直接用图例说明更直观和准确,但不知何原因我截的图都没有自动保存。所以很多内容是凭记忆后写的,难免有疏漏。加之每个人的系统,环境,配置等都不同,安装过程仅供参考。
2,上面提到的几个问题,请知道的同学解答一下。 多谢!
2,VNPY的很多功能架构还有待继续不断学习理解。 希望有机会多向群里的高手学习,早日达到驾轻就熟的程度。

最后分享一个刚刚把几个策略加载成功的界面:

description

Member
avatar
加入于:
帖子: 27
声望: 0

$./configure --prefix
提示:没有那个文件或目录。能否提供下configure的路径,我这里查到了不少,不知道是哪个文件?

Member
avatar
加入于:
帖子: 19
声望: 0

周海滨 wrote:

$./configure --prefix
提示:没有那个文件或目录。能否提供下configure的路径,我这里查到了不少,不知道是哪个文件?

这是你自己打算装在哪个目录下,你自己设定的 ,比如 ./configure --prefix=/usr/

$ ./configure --prefix = 把你自己打算安装的目标目录填在这儿

Member
avatar
加入于:
帖子: 27
声望: 0

vincent727 wrote:

周海滨 wrote:

$./configure --prefix
提示:没有那个文件或目录。能否提供下configure的路径,我这里查到了不少,不知道是哪个文件?

这是你自己打算装在哪个目录下,你自己设定的 ,比如 ./configure --prefix=/usr/

$ ./configure --prefix = 把你自己打算安装的目标目录填在这儿

后面那个参数我明白是替换成我想安装的目录。但是这个指令程序没找到在哪,可能是我的系统环境里没有这个configure的正确路径,或者这个程序是需要先安装某个程序包才有?

Administrator
avatar
加入于:
帖子: 4500
声望: 320

给你加个精华

Member
avatar
加入于:
帖子: 19
声望: 0

用Python的交易员 wrote:

给你加个精华

没想到处女帖就成精了,嘿嘿!

多谢总舵主!请总舵主多多指导!

Member
avatar
加入于:
帖子: 19
声望: 0

周海滨 wrote:

vincent727 wrote:

周海滨 wrote:

$./configure --prefix
提示:没有那个文件或目录。能否提供下configure的路径,我这里查到了不少,不知道是哪个文件?

这是你自己打算装在哪个目录下,你自己设定的 ,比如 ./configure --prefix=/usr/

$ ./configure --prefix = 把你自己打算安装的目标目录填在这儿

后面那个参数我明白是替换成我想安装的目录。但是这个指令程序没找到在哪,可能是我的系统环境里没有这个configure的正确路径,或者这个程序是需要先安装某个程序包才有?

没太明白你的意思,你是进入vnpy-2.1.3目录下安装的么???

Member
avatar
加入于:
帖子: 27
声望: 0

我的系统里提示找不到configure这个程序。
./configure *: No such file or directory

Member
avatar
加入于:
帖子: 19
声望: 0

周海滨 wrote:

我的系统里提示找不到configure这个程序。
./configure *: No such file or directory

用find 找一下 configure.,看看有什么文件?

Member
avatar
加入于:
帖子: 19
声望: 0

vincent727 wrote:

周海滨 wrote:

我的系统里提示找不到configure这个程序。
./configure *: No such file or directory

用find 找一下 configure.,看看有什么文件?

尝试一下,你在运行 ./configure --prefix=xxx 之前, 加一个autoconf ? 即多了一步:
$ autoconf
$ ./configure --prefix=xxx
$ make
$ sudo make install

Member
avatar
加入于:
帖子: 27
声望: 0

vincent727 wrote:

vincent727 wrote:

周海滨 wrote:

我的系统里提示找不到configure这个程序。
./configure *: No such file or directory

用find 找一下 configure.,看看有什么文件?

尝试一下,你在运行 ./configure --prefix=xxx 之前, 加一个autoconf ? 即多了一步:
$ autoconf
$ ./configure --prefix=xxx
$ make
$ sudo make install

本机装上autoconf,但是这个命令也是需要跟一堆参数指令,搞不定啊,刚接触linux,新装的Ubuntu20.04,估计是缺各种模块。

description

description

Member
avatar
加入于:
帖子: 19
声望: 0

周海滨 wrote:

vincent727 wrote:

vincent727 wrote:

周海滨 wrote:

我的系统里提示找不到configure这个程序。
./configure *: No such file or directory

用find 找一下 configure.,看看有什么文件?

尝试一下,你在运行 ./configure --prefix=xxx 之前, 加一个autoconf ? 即多了一步:
$ autoconf
$ ./configure --prefix=xxx
$ make
$ sudo make install

本机装上autoconf,但是这个命令也是需要跟一堆参数指令,搞不定啊,刚接触linux,新装的Ubuntu20.04,估计是缺各种模块。

description

description

运行一下 find / -name 'configure.' configure. 两边加上星号 我打的星号怎么总显示不出来?

Member
avatar
加入于:
帖子: 19
声望: 0

另外运行一下,装build-essential:
sudo apt-get update
sudo apt-get install build-essential

再运行一遍安装过程看看

Member
avatar
加入于:
帖子: 27
声望: 0

vincent727 wrote:

另外运行一下,装build-essential:
sudo apt-get update
sudo apt-get install build-essential

再运行一遍安装过程看看

共96行记录,有些多,不知道那个是能用的?
/sys/kernel/tracing/events/xhci-hcd/xhci_configure_endpoint
/sys/kernel/tracing/events/xhci-hcd/xhci_configure_endpoint_ctrl_ctx
/sys/kernel/debug/tracing/events/xhci-hcd/xhci_configure_endpoint
/sys/kernel/debug/tracing/events/xhci-hcd/xhci_configure_endpoint_ctrl_ctx
/var/lib/app-info/icons/ubuntu-focal-universe/64x64/configure-debian_configure-debian-48x48.png
/snap/core18/1754/usr/lib/python3/dist-packages/cloudinit/config/pycache/cc_apt_configure.cpython-36.pyc
/snap/core18/1754/usr/lib/python3/dist-packages/cloudinit/config/cc_apt_configure.py
/snap/core18/1754/usr/lib/python3/dist-packages/oauthlib/oauth1/rfc5849/endpoints/pycache/pre_configured.cpython-36.pyc
/snap/core18/1754/usr/lib/python3/dist-packages/oauthlib/oauth1/rfc5849/endpoints/pre_configured.py
/snap/core18/1754/usr/lib/python3/dist-packages/oauthlib/oauth2/rfc6749/endpoints/pycache/pre_configured.cpython-36.pyc
/snap/core18/1754/usr/lib/python3/dist-packages/oauthlib/oauth2/rfc6749/endpoints/pre_configured.py
/snap/core18/1754/usr/share/bash-completion/completions/configure
/snap/core18/1754/usr/share/bash-completion/completions/dpkg-reconfigure
/snap/core18/1754/usr/share/bash-completion/completions/munin-node-configure
/snap/core18/1754/usr/share/subiquity/subiquitycore/ui/views/network_configure_interface.py
/snap/core18/1754/usr/share/subiquity/subiquitycore/ui/views/network_configure_manual_interface.py
/snap/core18/1754/usr/share/subiquity/subiquitycore/ui/views/network_configure_wlan_interface.py
/snap/core18/1705/usr/lib/python3/dist-packages/cloudinit/config/pycache/cc_apt_configure.cpython-36.pyc
/snap/core18/1705/usr/lib/python3/dist-packages/cloudinit/config/cc_apt_configure.py
/snap/core18/1705/usr/lib/python3/dist-packages/oauthlib/oauth1/rfc5849/endpoints/pycache/pre_configured.cpython-36.pyc
/snap/core18/1705/usr/lib/python3/dist-packages/oauthlib/oauth1/rfc5849/endpoints/pre_configured.py
/snap/core18/1705/usr/lib/python3/dist-packages/oauthlib/oauth2/rfc6749/endpoints/pycache/pre_configured.cpython-36.pyc
/snap/core18/1705/usr/lib/python3/dist-packages/oauthlib/oauth2/rfc6749/endpoints/pre_configured.py
/snap/core18/1705/usr/share/bash-completion/completions/configure
/snap/core18/1705/usr/share/bash-completion/completions/dpkg-reconfigure
/snap/core18/1705/usr/share/bash-completion/completions/munin-node-configure
/snap/core18/1705/usr/share/subiquity/subiquitycore/ui/views/network_configure_interface.py
/snap/core18/1705/usr/share/subiquity/subiquitycore/ui/views/network_configure_manual_interface.py
/snap/core18/1705/usr/share/subiquity/subiquitycore/ui/views/network_configure_wlan_interface.py
/snap/gnome-3-34-1804/36/usr/share/libtool/configure
/snap/gnome-3-34-1804/36/usr/share/libtool/configure.ac
/snap/gnome-3-34-1804/24/usr/share/libtool/configure
/snap/gnome-3-34-1804/24/usr/share/libtool/configure.ac
/snap/snap-store/433/usr/share/doc/libsasl2-2/README.configure-options
/snap/snap-store/454/usr/share/doc/libsasl2-2/README.configure-options
/usr/sbin/dpkg-preconfigure
/usr/sbin/dpkg-reconfigure
/usr/share/help-langpack/zh_CN/anjuta-manual/autotools-build-configure-dialog.page
/usr/share/help-langpack/zh_CN/anjuta-manual/autotools-build-configure.page
/usr/share/automake-1.16/am/configure.am
/usr/share/man/da/man8/dpkg-preconfigure.8.gz
/usr/share/man/fr/man8/dpkg-preconfigure.8.gz
/usr/share/man/fr/man8/dpkg-reconfigure.8.gz
/usr/share/man/pt/man8/dpkg-preconfigure.8.gz
/usr/share/man/pt/man8/dpkg-reconfigure.8.gz
/usr/share/man/es/man8/dpkg-preconfigure.8.gz
/usr/share/man/es/man8/dpkg-reconfigure.8.gz
/usr/share/man/ru/man8/dpkg-preconfigure.8.gz
/usr/share/man/ru/man8/dpkg-reconfigure.8.gz
/usr/share/man/de/man8/dpkg-preconfigure.8.gz
/usr/share/man/de/man8/dpkg-reconfigure.8.gz
/usr/share/man/man8/dpkg-preconfigure.8.gz
/usr/share/man/man8/dpkg-reconfigure.8.gz
/usr/share/man/pt_BR/man8/dpkg-preconfigure.8.gz
/usr/share/libreoffice/help/zh-CN/text/shared/guide/configure_overview.html
/usr/share/libreoffice/help/en-US/text/shared/guide/configure_overview.html
/usr/share/libreoffice/help/media/icon-themes/cmd/sc_configuredialog.svg
/usr/share/libreoffice/help/media/icon-themes/cmd/lc_configuredialog.svg
/usr/share/cups/templates/fr/printer-configured.tmpl
/usr/share/cups/templates/es/printer-configured.tmpl
/usr/share/cups/templates/ru/printer-configured.tmpl
/usr/share/cups/templates/ja/printer-configured.tmpl
/usr/share/cups/templates/printer-configured.tmpl
/usr/share/cups/templates/de/printer-configured.tmpl
/usr/share/cups/templates/pt_BR/printer-configured.tmpl
/usr/share/doc/apt/examples/configure-index
/usr/share/doc/xorg/howto/configure-input.txt.gz
/usr/share/doc/xorg/howto/configure-input.html
/usr/share/doc/libsasl2-2/README.configure-options
/usr/share/bash-completion/completions/configure
/usr/share/bash-completion/completions/munin-node-configure
/usr/share/bash-completion/completions/dpkg-reconfigure
/usr/share/mysql-common/configure-symlinks
/usr/lib/udev/udev-configure-printer
/usr/lib/python3/dist-packages/oauthlib/oauth2/rfc6749/endpoints/pre_configured.py
/usr/lib/python3/dist-packages/oauthlib/oauth2/rfc6749/endpoints/pycache/pre_configured.cpython-38.pyc
/usr/lib/python3/dist-packages/oauthlib/openid/connect/core/endpoints/pre_configured.py
/usr/lib/python3/dist-packages/oauthlib/openid/connect/core/endpoints/pycache/pre_configured.cpython-38.pyc
/usr/lib/python3/dist-packages/oauthlib/oauth1/rfc5849/endpoints/pre_configured.py
/usr/lib/python3/dist-packages/oauthlib/oauth1/rfc5849/endpoints/pycache/pre_configured.cpython-38.pyc
/usr/lib/python3/dist-packages/lazr/uri/configure.zcml
/usr/lib/systemd/system/configure-printer@.service
/home/zhb/vnpy-hoio/configure_list.txt
/home/zhb/miniconda3/pkgs/sip-4.19.8-py37hf484d3e_0/info/test/test/configure.py
/home/zhb/miniconda3/pkgs/sip-4.19.8-py37hf484d3e_0/info/recipe/test/configure.py
/home/zhb/miniconda3/pkgs/pyqt-5.9.2-py37h05f1152_2/info/recipe/configure.patch
/home/zhb/miniconda3/pkgs/libffi-3.2.1-hd88cf55_4/info/recipe/configure_includedir_option.patch
/home/zhb/miniconda3/pkgs/libffi-3.3-he6710b0_1/info/recipe/configure_includedir_option.patch
/home/zhb/miniconda3/pkgs/qt-5.9.7-h5867ecd_1/info/recipe/0013-qtbase-add-disable-new-dtags-configure-option.patch
/home/zhb/miniconda3/pkgs/qt-5.9.7-h5867ecd_1/mkspecs/features/configure.prf
/home/zhb/miniconda3/pkgs/qt-5.9.7-h5867ecd_1/mkspecs/features/qt_configure.prf
/home/zhb/miniconda3/pkgs/qt-5.9.7-h5867ecd_1/mkspecs/features/configure_base.prf
/home/zhb/miniconda3/pkgs/qt-5.9.7-h5867ecd_1/mkspecs/features/data/configure.json
/home/zhb/miniconda3/envs/vnpy/mkspecs/features/configure.prf
/home/zhb/miniconda3/envs/vnpy/mkspecs/features/qt_configure.prf
/home/zhb/miniconda3/envs/vnpy/mkspecs/features/configure_base.prf
/home/zhb/miniconda3/envs/vnpy/mkspecs/features/data/configure.json

Member
avatar
加入于:
帖子: 19
声望: 0

没有看到可以执行的vnpy 的configure文件。你的系统应该还是缺少一些模块。make install源码安装有时是挺折腾的,上次我装个模块, 折腾了好久,最后照着网上的一个建议,最后用了autoconf, autoreconf, 时间久了都忘了怎么折腾了。
你网上再搜索一下。 一般应该四步就装成功

你换一个目录,重新解压,然后再按照上面的正确步骤试一边。

Member
avatar
加入于:
帖子: 27
声望: 0

好的,我再找找看。我关注的是通过make编译,是不是可以支持其他gateway,下午测试,发现好多接口都不能直接调用,除了ctp gateway可以正常加载。看文档只有少数的几个api文件夹内有so文件,是不是只有生成api对应的so文件,才能正常使用?

Member
avatar
加入于:
帖子: 19
声望: 0

google 上找到的,不过是英文的,希望对你有帮助

The reason why you are getting the "bash: ./configure: No such file or directory" is because you are not in the right directory where the downloaded file you are about to install is located.

To fix that

(a.) FOLLOWING README INSTRUCTION

Locate where your downloaded Java tar.gz file.
Extract the file by right-clicking on it and select 'Extract Here'.
Look for the 'Readme text' file and open it.
Follow the instruction on how to install the file in the Readme text(installation of tar.gz file can be different from normal commands used to do installation of files in Ubuntu).

(b.) USING GENERAL COMMANDS

Open the terminal by pressing CTRL + ALT +T.
Type tar -zxvf .tar.gz .
Type sudo su and enter your root password.
type cd and add the path of your downloaded file . If you do not know the path of the downloaded file type ls -a to list all the directories and locate your file directory.
Type ./configure and press ENTER key
Type make and press ENTER key.
Type make install and press ENTER key.

(c) USING THE UBUNTU SOFTWARE CENTER

Open Ubuntu Software Center

Type java in the search

Look for Java SE 7 and click 'install' to install it.
Member
avatar
加入于:
帖子: 19
声望: 0

周海滨 wrote:

好的,我再找找看。我关注的是通过make编译,是不是可以支持其他gateway,下午测试,发现好多接口都不能直接调用,除了ctp gateway可以正常加载。看文档只有少数的几个api文件夹内有so文件,是不是只有生成api对应的so文件,才能正常使用?

这也是我关心的,很多gateway, 还没试。 回头都试一下。

Member
avatar
加入于:
帖子: 15
声望: 1

lei@ubuntu:~/vnpy2$ sudo apt-get update
Hit:1 http://dl.google.com/linux/chrome/deb stable InRelease
Hit:2 http://mirror.lzu.edu.cn/ubuntu focal InRelease
Hit:3 http://mirror.lzu.edu.cn/ubuntu focal-updates InRelease
Hit:4 http://mirror.lzu.edu.cn/ubuntu focal-backports InRelease
Hit:5 http://mirror.lzu.edu.cn/ubuntu focal-security InRelease
Reading package lists... Done
W: Target Sources (main/source/Sources) is configured multiple times in /etc/apt/sources.list:2 and /etc/apt/sources.list:7
lei@ubuntu:~/vnpy2$ sudo apt-get install build-essential
Reading package lists... Done
Building dependency tree
Reading state information... Done
build-essential is already the newest version (12.8ubuntu1).
0 upgraded, 0 newly installed, 0 to remove and 0 not upgraded.
lei@ubuntu:~/vnpy2$ ./configure
bash: ./configure: No such file or directory
lei@ubuntu:~/vnpy2$
why??

vincent727 wrote:

没有看到可以执行的vnpy 的configure文件。你的系统应该还是缺少一些模块。make install源码安装有时是挺折腾的,上次我装个模块, 折腾了好久,最后照着网上的一个建议,最后用了autoconf, autoreconf, 时间久了都忘了怎么折腾了。
你网上再搜索一下。 一般应该四步就装成功

你换一个目录,重新解压,然后再按照上面的正确步骤试一边。

Member
avatar
加入于:
帖子: 19
声望: 0

liangzi wrote:

lei@ubuntu:~/vnpy2$ sudo apt-get update
Hit:1 http://dl.google.com/linux/chrome/deb stable InRelease
Hit:2 http://mirror.lzu.edu.cn/ubuntu focal InRelease
Hit:3 http://mirror.lzu.edu.cn/ubuntu focal-updates InRelease
Hit:4 http://mirror.lzu.edu.cn/ubuntu focal-backports InRelease
Hit:5 http://mirror.lzu.edu.cn/ubuntu focal-security InRelease
Reading package lists... Done
W: Target Sources (main/source/Sources) is configured multiple times in /etc/apt/sources.list:2 and /etc/apt/sources.list:7
lei@ubuntu:~/vnpy2$ sudo apt-get install build-essential
Reading package lists... Done
Building dependency tree
Reading state information... Done
build-essential is already the newest version (12.8ubuntu1).
0 upgraded, 0 newly installed, 0 to remove and 0 not upgraded.
lei@ubuntu:~/vnpy2$ ./configure
bash: ./configure: No such file or directory
lei@ubuntu:~/vnpy2$
why??

vincent727 wrote:

没有看到可以执行的vnpy 的configure文件。你的系统应该还是缺少一些模块。make install源码安装有时是挺折腾的,上次我装个模块, 折腾了好久,最后照着网上的一个建议,最后用了autoconf, autoreconf, 时间久了都忘了怎么折腾了。
你网上再搜索一下。 一般应该四步就装成功

你换一个目录,重新解压,然后再按照上面的正确步骤试一边。

make 编译安装有时是挺折腾,另外一个网友也遇到这个问题。
估计是不同的系统,环境,配置等导致的。 我的ubuntu 是英文版本。 这两个周我还装了一些模块。我的安装过程也有一些错误,但一步步解决了。

你可以网上再搜一下make 安装错误的解决办法。看看能不能解决。

© 2015-2022 上海韦纳软件科技有限公司
备案服务号:沪ICP备18006526号

沪公网安备 31011502017034号

【用户协议】
【隐私政策】
【免责条款】